


This enclosure is fine for a basic user that is still a beautiful piece Bitfenix Design with clean look in your home.
Pros
- Plenty of HDD/SSD locks
- Space for large power supply
- Clean look
- Led lighting (Off/Red/Blue)
- Space for long GPUS 320mm
- Standard 2 quiet fans
- HDD Spin, click and fixed
- Space for water cooling
- Dust filters are present
Cons
- Not enough space for cable management
- Door is not portable (move to the left to open)
- HDD/SSD locks are not removable
- No Fan holes at the top
- Lacks a memory card reader or hotswap
- LED is via SATA powered (Prefer Molex)
Final conclusion
Score: 4Per criterion
Modbaarheid
Score: 3
Ease of installation
Score: 3
Design
Score: 4
Koelingsmogelijkheden
Score: 3
Click
Score: 3
Build quality
Score: 4
Price
Score: 4
Review of the BitFenix Shadow

Table of contents:
- Introduction
- Specifications
- Design
- Extract
- Installation
- Cable management
- Noise/Airflow
- Comparison
- Conclusion
Introduction
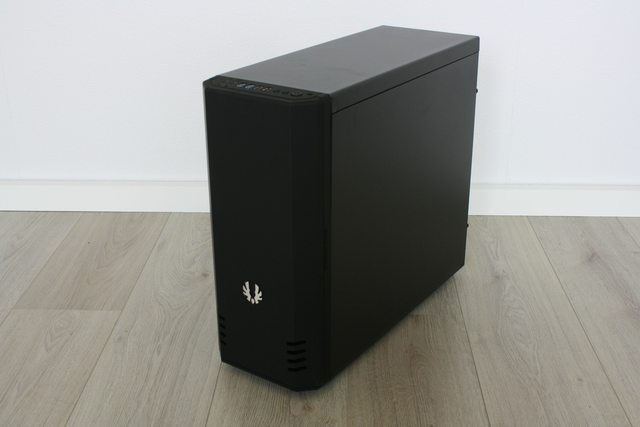
A new housing, so a new review. This time I take the Bitfenix Shadow work in progress. The Bitfenix Shadow is an enclosure for the basic user that is also a piece of design in the house want to get. The front panel is just so soft, that I not be left alone. You can notice that, like the Bitfenix Flo again is chosen for Softouch. I find it very nice, but on the other hand, I do empathize if you would say that he is two different shades of black. And that is also just so.
Of course, I’m talking about the design and reliability and we go back to unpacking and installation. You learn to adapt your housing to know once you’re underway with unpacking and installation. And I’m going to get everything back with beautiful images that the housing benefit. Because words say much, but pictures are more. Now, that works for me in any case.
So and so let’s start where you actually came here for and that is the review of the Bitfenix Shadow.

#
Specifications
The Bitfenix Shadow is like his brothers with of Plastic with a metal black casing. The front panel is made of plastic with the so-called SofTouch. Most of the housings and headset is provided. I find it a nice coating, but taste is of course debatable.
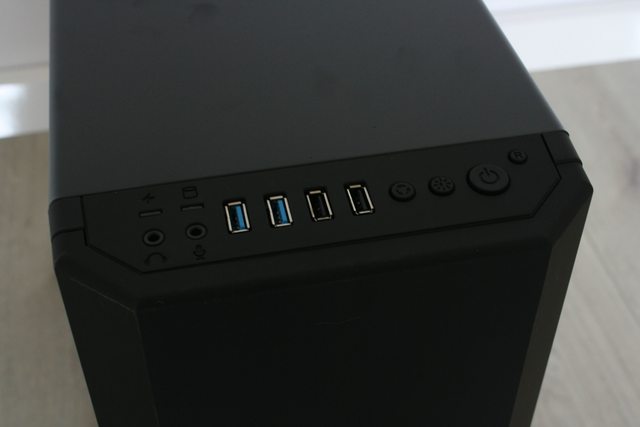
The top panel is equipped with 2x USB2.0 and 2x USB3.0. Very useful if you have external HDD or USB sticks. However, the 2 USB2.0 redundant as you can with only USB3.0, but if you are, indeed, no support for USB3.0, this is a logical choice.
There is space for 4x 120mm fans, 2 are included by Bitfenix. The fan’s that are included are very quiet. I have tested them in an open space, and even there you can hear them almost not. Of course, it is already quite cool that you have 2 fan’s all included for a soft price for this cabinet down counts.
The space for your HDD/SSD is really spacious, to name a few. You’ll have room for 7x 3.5” , 1x 2.5” and 3x 5.25”. This provides for the Bitfenix you if you have many HDDS on your previous PC’s. Indeed, there are people that often have their HDD’s transfer, not destroy it. In this case you’re definitely good if you have lots of space to have. The downside is that the 3.5” bays can’t get away. So, if you’re a 240 RAD would like to build in then you would get this off to demolish. And this is also a downside for the modbaarheid.
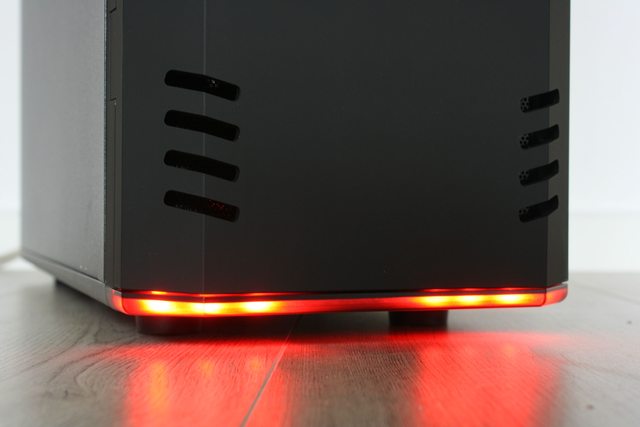
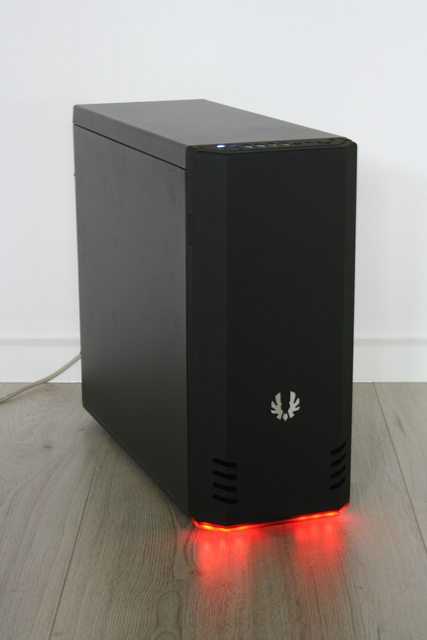
What this enclosure special is that you can choose the colour LED lights, red, blue and off (off is indeed not a color). The lighting is beautifully colored, especially because there is a diffuser for. Useful, of course, is that you the lights. For the rest, it is a very nice feature for users who have a red or a blue theme.
The rest of the information can be found below in the summary of Bitfenix.

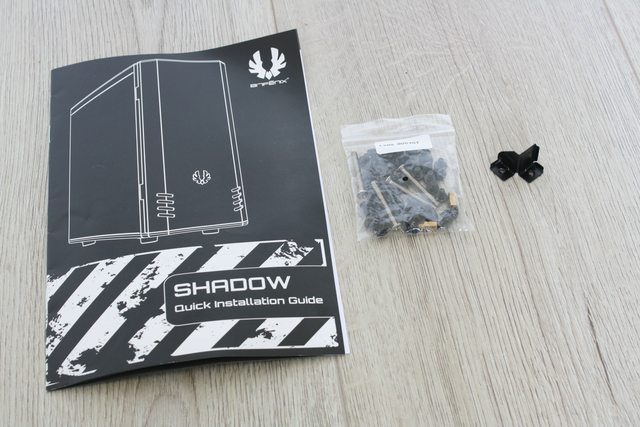
Bitfenix also provides a booklet, screws and a PSU holder. The PSU holder that I’ve never seen it, only in Corsair you come up against. This turn off your PSU completely fixed to the casing.
Design
The design of the Bitfenix Shadow is of course clean. He has a front panel which is made of the SofTouch which was incredibly soft to the touch but also a nice matte looks creates. The front panel is left open, and is unfortunately also cannot be moved to the right. Here, most of the users, or about to fall. It’s also a downside. But that does not mean that the front is very nice.

Of course the Bitfenix Shadow with a nice logo on the front. Also, there are holes made for the necessary airflow. If you have a lot of HDD’s have posted then I can imagine that you think this is not enough.

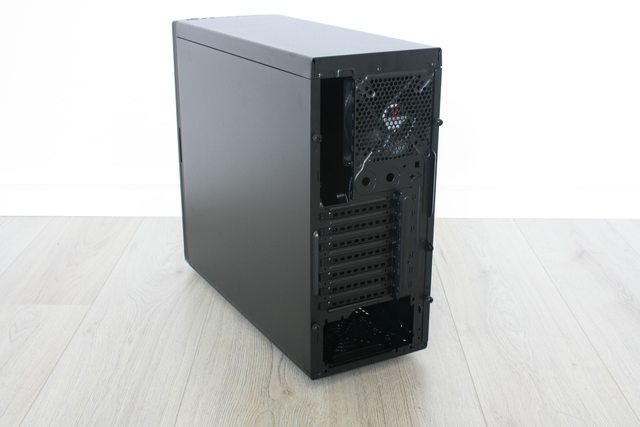
The side is not equipped with a window and is, therefore, a sealed enclosure. If you do not use a nice cable management then it is also not a problem. However, there is a window in the building. Should you be the case want to go modden, of course.
The back of the Bitfenix Shadow has openings for a custom water cooling and the GPU holder is a ratchet system. Also there is on the housing a recess for a clasp. If you hardware want to protect and chaining to your desk.
And, of course, is the showpiece of the Bitfenix only with a great feature for the lighting. The lights comes in the colors red and blue. The choice is to make on the top panel where the power button is. You have the options on/off and blue or red. Honestly, it is not a picture?

#
Extract
The best part of course remains the unpacking of a box. And this is also certainly important. You can to the box all brands whether you case is properly filed and therefore must also be strong enough for the transport of your new acquisition. And that’s with Bitfenix no different. He is protected with foil and styrofoam and the cardboard is very sturdy. The unpacking was no problem.
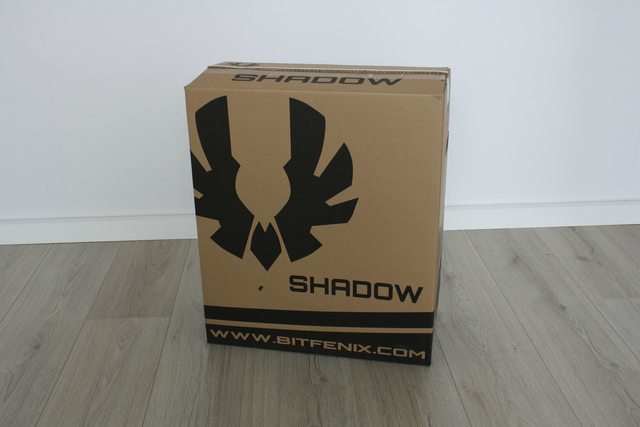
On the back of the box we can see the housing is depicted with the accompanying text what the Shadow makes this place so special. The three good points are definitely appointed. The magnetic door, the amount of bays and of course the led lights.

When unpacking the box, the Bitfenix Shadow sealed with plastic and surrounded by even styrofoam. The case was very firmly in the box. The first thing immediately noticeable if you have the box open up, is that you will be welcomed by the Bitfenix logo.

The top of the Shadow is equipped with a HDD and Power Led, this is to see if the PC still powered on, either your HDD’s are at work. Sure is handy, but the Led is very sheet.
You can also find the microphone and headphone jack, handy if you don’t do this at the back of the PC. Practically, I do not find it in combination with a headset. But it is now once standard.
At the top, you can also become the Led lighting send. The left circle (at the power button) is on and off and the left the right you can find the blue or red option. Also, you can find the 2xUSB2.0 and 2xUSB3.0 connections, very useful for USB sticks. And of course the power button.
When you open the lid at the front it has a tape. This is aimed particularly at the transport, so that is not your filter falls off. When unpacking and opening the box was this to be the case. He hung there loose, but the tape kept it in place.
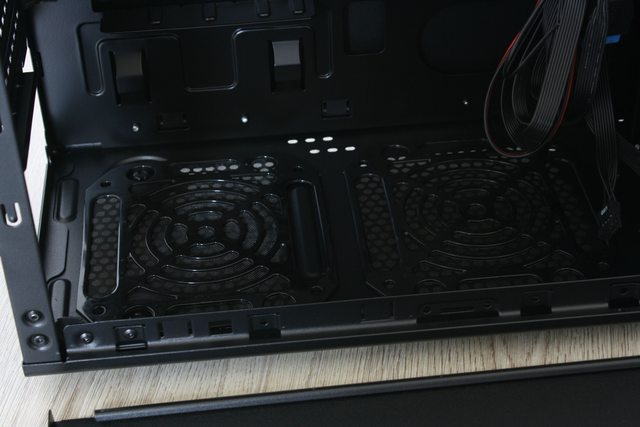
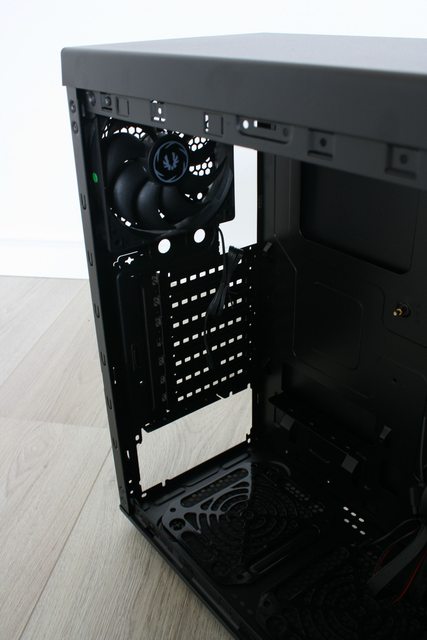
The dust filters are easy to remove by means of a click system. Simply push and he let loose. You’ll also find behind the panel 3 5.25” bays.

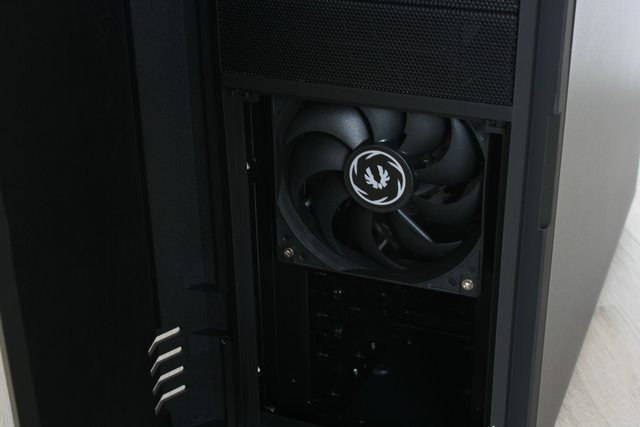
After removing the dust filter, we see the included Bitfenix 120mm Fan with a bitfenix Logo. There is still space for a extra fan for better airflow. The dust filter is easy to clean with a cloth and a vacuum cleaner.

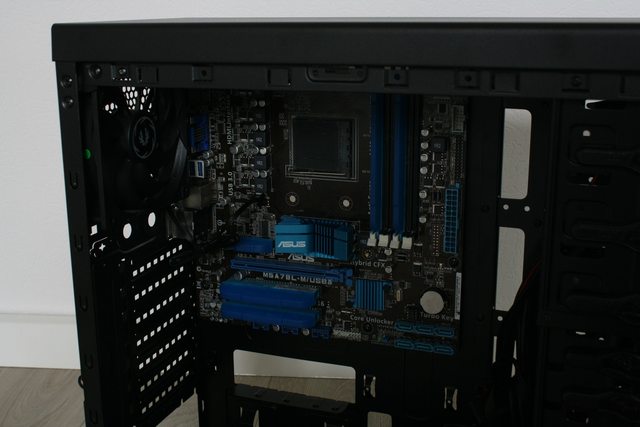
The back of the Bitfenix is also equipped with an included 120mm fan. There is also space for an external water cooling. The side panels are attached with 4 screws. This will enable you to easily open the case. Also the GPU locks are protected by a ratchet system instead of screws.

#
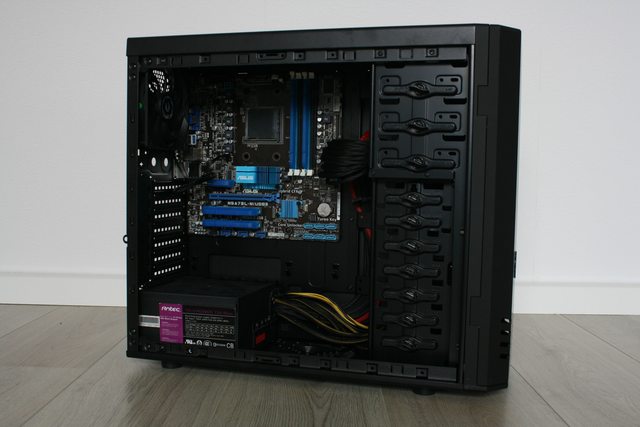
Installation
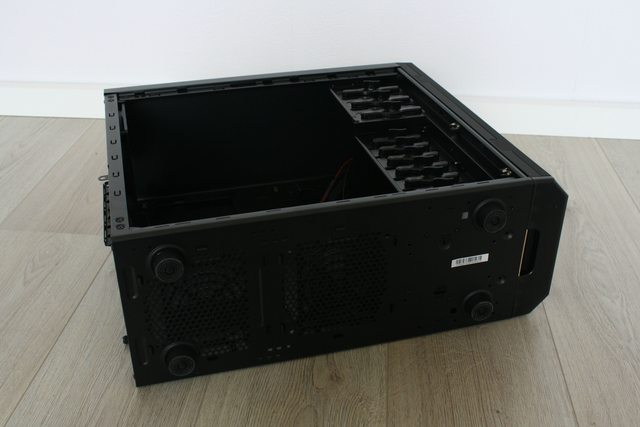
As I mentioned earlier in the review have been appointed is that the installation, of course, is the most important. Here you’ll sometimes behind things or go well or sometimes miss. I first started with the removal of the side panels. As you can see from the image below, there is very little space for cable management. This is also the same for me a downside. The space is minimal.

The housing is equipped with dust filters at the bottom where the PSU would place. However, there is space for an additional 120mm fan to the airflow to make it larger. Here you would also get a water cooling system, but after connecting the PSU shows that this is not possible.
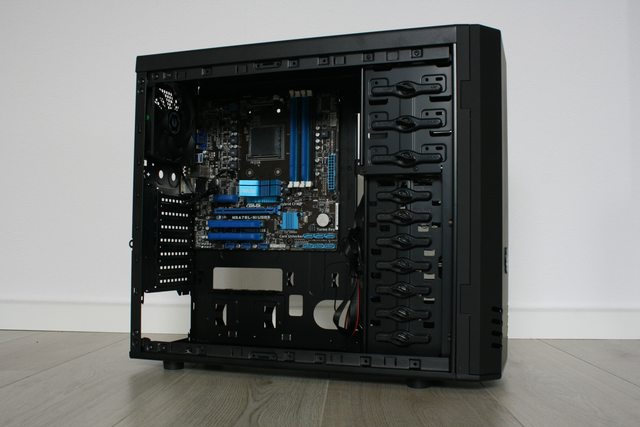
Below, you can see that you really have a lot of space to build your system. Yourself a custom water-cooling is possible because of the space that you do have.
Of course, we must how much the government space of the HDD/SSD is not forgotten. There are very many! For my own use, I find it to be too much and would prefer the bay to remove. But don’t worry! If you don’t have one, it is not at the expense of airflow. Because the bay is completely free so the air simply can be moved without hindrance. Because there are no bulkheads in.

All bays are equipped with a click-and-turn system. The use is of course brilliant, you have no screws needed. However, there is the option to set the screws. For example, when installing a Bay Reservoir for water cooling.

Yes, it is and continues to be a major advantage in a case such as this.

At the bottom you can see the grille and the filters sit. The Bitfenix is also equipped with 4 soft pads for you on your desk or the ground. And on the right side you will see a white line, and that is the printed circuit board of the Led. There is also an opening which is for the removal of the front panel in its entirety. The front panel is held in place by 4 claws in holes. So it is easily removable with a good effort.
The installation of the motherboard very easy. The moederbordtray is equipped with a screw with a pen in mind, you can make your motherboard easy to convert so that the schroevenopeningen equal. With a mATX board you have 2 extra supplied with screw holes.
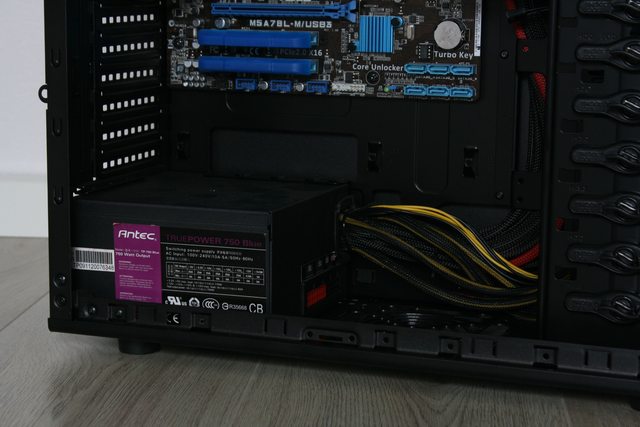
For cable management I’m going to continue with the powersupply.
If you have more background like that, you can below to find.
BitFenix Shadow installation guide you can find here: Click
#
Cable management
Now let’s start with the install of the wiring harness and powersupply (PSU). Installing the PSU is very easy. A matter of in place and tighten. There is also an angle included with the guide, but I don’t have to use it. The cables are easily in the housing around the stitches, although I doubt whether I have the housing close get.
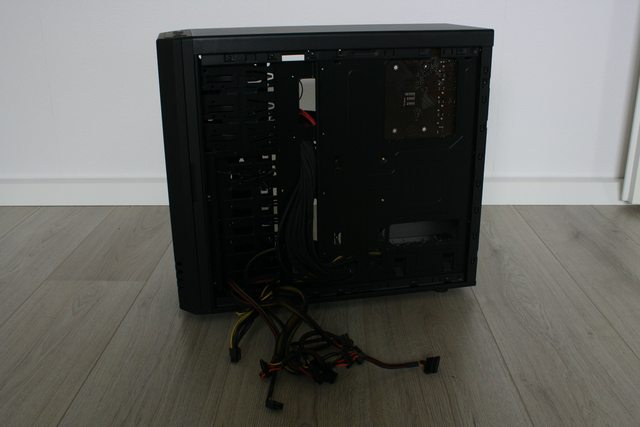
An advantage I have with the PSU is that this is semi modular. If you have a fixed harness then you can encounter problems. But anyway, the housing is closed, so you can’t see it.
However, I am very fond of good cable management. So I have done the best.
This is the result with a little effort. There was still enough room for the cables to be hidden away on the side of the 3.5” bays.


#
Noise
Since I only have the PSU fan and the two Bitfenix fans have had can you honestly say that this silence is to be called. However, when inserting a HDD, will this still resonate in the cabinet. Because the inside of the bays is not covered in rubber. Unless you have a SSD, you will not be bothered of. The Fans that are included are very quiet and run on 1200rpm spin. So nauwelijk audible. Also, the speed is not through the housing to allow for some more RPM’s
The Airflow of this case is very good. You would say that the 3.5″ bays in the road. But the 3.5″bays have no bulkheads, so the air can easily pass through it.
With the installing of a total of 4 120mm fans can see your airflow as follows:
3x Intake (2 front, 1 bottom) and 1x Outake (1 rear)
#
Comparison
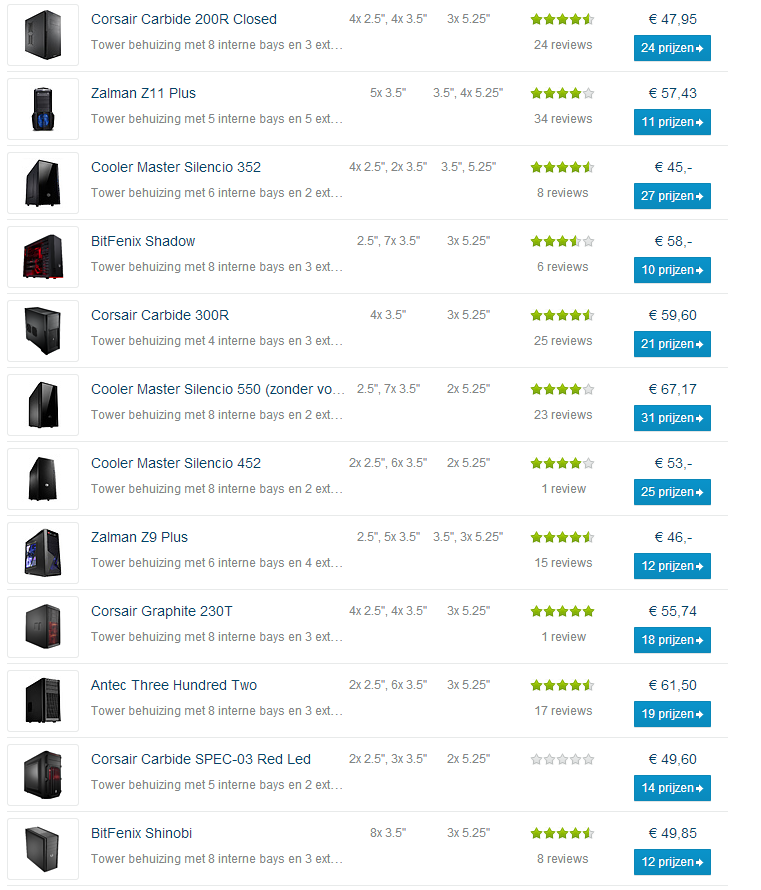
In comparison I look again at the price and what you instead could buy. The Bitfenix Shadow is at about 58, and goes to fight with the Cooler Master Silencio 550. They look very similar to each other but the Bitfenix has multiple HDD bays. What we also find in the list is the Corsair Carbide and the Antec Three Hundred Two.
Link to the hundred of Tweakers.net
Note: I have this build does not go down because I no parts are more about to have to sit once inside the housing where I’m going to do with the review.
Note2: The maximum height of your CPU cooler should 165mm amounts.
Note 3: The maximum length of your GPU should 320mm amounts.
#
Conclusion
And then we come to the final conclusion of this review. The Bitfenix Shadow is a beautiful base unit with enough space for your harddrives and as an added feature the Led lighting. The housing has its advantages and disadvantages. However, weigh the good points more on dantegen the bad points. The good points I can find are the HDD slots, space for your power supply, a clean look and the extra led lighting. And the lesser points are the space for cables, the door is not converting and the convenience of a card reader. The latter would be the case a little bit more expensive.
This is how the Bitfenix Shadow still a more than sufficient.
Back to top
Also take a look at my other productervaringen. Reactions and comments are always desired. Thank you for your attention.