If you have just bought a new Mac or MacBook, you can make your current Mac salable in a few steps. In this guide, we explain step by step how to switch to a new Mac and how to prepare your old Mac (both Intel and Apple Silicon) for sale, by backing up all data and then erasing it.
Selling a Mac: Switching to a New Mac and Getting it Ready to Sell
If you are planning to buy a new Mac or MacBook, you may be wondering how best to transfer all your data and what to do with your old Mac. That's why in this article we explain how you can switch to your new Mac and securely erase the data on your previous Mac. If you want to sell your old Mac afterwards, all you have to do is erase all data and restore your Mac to factory settings. Read all about preparing your Mac for sale here.
- Check AppleCare
- Intel or Apple Silicon
- Erase all content and settings
- Backup
- Transfer data
- Log out
- Reset NVRAM
- Disconnect Bluetooth
- Clear
- Clean
Step 1. Check your AppleCare coverage
If the Mac you want to sell isn't that old, you may still have AppleCare coverage. This extends the warranty of an Apple product, including a Mac. That extra warranty is linked to the product and the buyer. To check the coverage, go to System Settings > General > Info. You can see the current status in the Opacity section.
If you want to sell your Mac that still has coverage, you'll need to transfer AppleCare coverage to the new owner.
Also see 


With AppleCare you can extend the service and support of your Apple product. If you sell or give away your device, you can often transfer your current AppleCare to the new owner. That is how it works.
Step 2. Intel or Apple Silicon? This determines your next steps
It differs per model which steps you need to follow to prepare your Mac for sale. Models with an Intel chip (mid 2020 or older) require more steps than a Mac with an Apple Silicon chip. If you're not sure what type of model you have, here's how to find it:
- Intel: Go to > About this Mac. Under the name you will see a year. If it is from mid-2020 or older, then you have an Intel Mac. Also check the word Intel under the heading Processor.
- Apple Silicon: Go to > About this Mac. If the model is from late 2020 or newer, then you have a Mac with an Apple Silicon chip. You can double check this under the name, where it says which M chip is in the Mac.
If you have a Mac with an Intel chip, go to step 4 in this tip and follow the further steps until the last step.
If you have a Mac with an Apple Silicon chip that you want to get ready for sale, go then go to step 3 in this tip and follow the instructions.
Step 3. Erase all content and settings on Apple Silicon Mac
On a Mac with an Apple Silicon chip, you are now going to erase all content and settings. This is done through the erase assistant, which erases all content, data, paired devices and other settings and resets your Mac to factory settings. To do this, go to System Settings > General > Transfer or reset > Erase all content and settings, then follow the next steps in our tip on how to completely erase your Mac. The delete assistant ensures that another backup is made.
See also 


How to reset your Mac to factory settings in a few steps
In this tip you can read how to reset a Mac to factory settings. If you have an older Mac without a T2 chip or Apple Silicon processor, it works differently. We explain the old and new way.
If you have completed this step and your Mac has been completely erased, you may want to go to step 10 in this tip to also clean the outside of the Mac. You can skip steps 4 through 9 on a Mac with Apple Silicon.
Step 4. Back up your data (Intel)
Before you clean out your old Mac, it is wise to secure all your data in a backup. For example, you can make a Time Machine backup, but you can also simply connect an external hard drive to your Mac and manually transfer the most important folders and files. Most data, such as contacts, calendar and photos, are stored in the cloud and can be easily retrieved on a new Mac. If you have saved documents locally, make sure you save them on an external drive or upload them to iCloud, Dropbox or another service.
If you don't want to worry about it, Time Machine is the best choice. Time Machine automatically creates a new backup as soon as your wireless drive is nearby or you connect the chosen drive to your Mac with a cable. You can read how to make a backup in our tip on making a Time Machine backup.
See also 


Making Time Machine backups of your Mac: what you need to know
Time Machine lets you back up your Mac, helping you find lost or deleted files. Time Machine prevents you from losing anything on your Mac and in this tip we explain how it works.
Step 5. Transfer data with Migration Assistant (Intel)
If you bought a new Mac, you can easily transfer the data from your previous Mac transfer to the new one. Apple has created the Migration Assistant for this. This tool lets you transfer all your data from a Mac, Time Machine backup, startup disk or Windows PC to the new Mac.
To use the Migration Assistant, first check the following:
- Make sure that both computers have the most recent software version.
- Check whether your old Mac has its own recognizable name. You can check this via System Preferences > Share > Computer name.
- Power both computers with the supplied power cables.

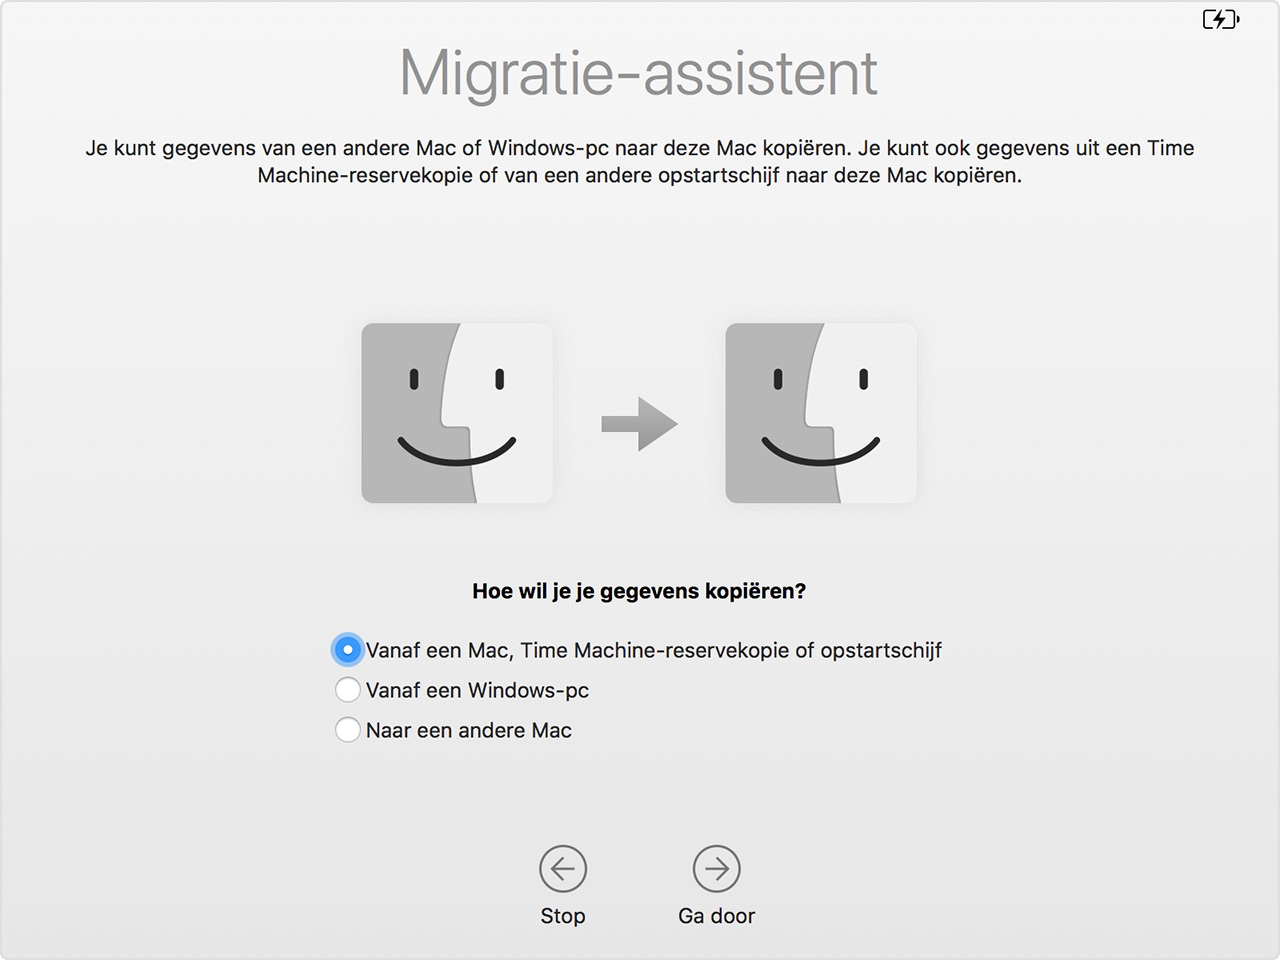
You now need to connect your new Mac to your old Mac, to the Time Machine backup, or to the startup disk. To make the connection between two Macs, both computers must be connected to the same network.
Then follow the steps in our in-depth tip on transferring your Mac data. For each method, we explain what you need to do to transfer all your Mac data safely.
See also  < img src="/wp-content/uploads/1cc97865f018807bf0badb5810d70269.gif" />
How to transfer your Mac data to your new Mac
Follow the steps in this tip to learn how to transfer your data from transfer your current Mac to your new Mac or MacBook. We'll show you the different ways to transfer your Mac data.
Step 6. Sign out of iTunes, iCloud and iMessage (Intel)
Now that you can start using your new Mac, it's important to prepare your old Mac for sale. Simply erasing the disk is not enough. It is also wise to log out of the various services. For example, iTunes in macOS Mojave or earlier has limited permissions for devices on which you can play your content.
To sign out of iTunes in macOS Mojave and earlier, here's how:
- Open iTunes and click Account > Permissions.
- Now choose Deauthorize this computer.
You then log out of iCloud on all macOS versions. This prevents your old Mac from remaining visible in your account. You can log out as follows:
- Go to System Settings > your name.
- Scroll down and click Log out.
 < img src="/wp-content/uploads/ac935cf1a2f800a830782819a5d1fac9.png" />
Also important: sign out of Apple's other services such as iMessage and FaceTime. The same steps apply to both apps:
- Open the Messages app and FaceTime app.
- Now go to Messages/FaceTime > Settings.
- In the Messages app, click Accounts/iMessage > Log out. For FaceTime, choose Settings > Log out.
Step 7. Reset NVRAM (Intel)
NVRAM stands for non-volatile random access memory. That sounds complicated, but it is actually very simple. NVRAM stores some user settings, such as screen resolution, startup disk, and speaker volume. Are you planning to sell your Apple Silicon Mac? Then it is not possible to reset the NVRAM. Your Mac automatically runs some tests at startup and will reset if necessary.
If you are selling a Mac with an Intel chip, you can follow these steps:
Resetting your NVRAM (or PRAM on older models) is very easy:
p>
- Shut down your old Mac.
- Turn it back on and immediately press and hold these four keys simultaneously: Option, Command, P and R.
- Release the keys after 20 seconds.
Resetting of NVRAM and PRAM can also help with troubleshooting. You can read more about it in our tip.
See also 


Resetting PRAM and NVRAM on Mac: Why and How?
Resetting your NVRAM or PRAM can fix issues with your screen, mouse, keyboard, startup disk, and other components. In this tip we explain how to reset NVRAM or PRAM. This only applies to Macs with an Intel processor.
Step 8. Disconnect Bluetooth accessories (Intel)
It may sound crazy, but don't forget to unplug Bluetooth accessories like mice and keyboards, too. Suppose you give your Mac to a family member, but you keep your own mouse and keyboard, it can happen that keys are pressed unintentionally via your keyboard on the old Mac that you gave away. This step is optional, but it's better to be safe than sorry.
Disconnecting Bluetooth accessories works as follows:
- Go to System Settings > Bluetooth.
- You will now see a list of linked accessories. Right-click an accessory with your cursor and click Forget.
If you are doing this on an iMac, iMac Pro, Mac Pro or Mac mini, make sure you have a wired mouse and keyboard to continue operating your Mac.
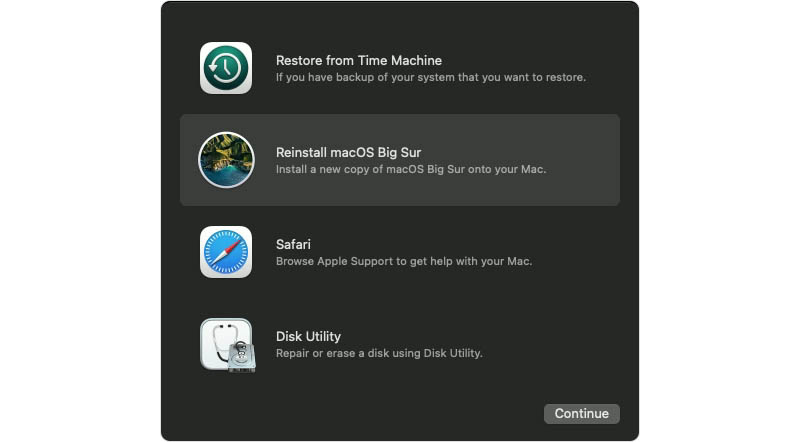
Step 9. Erase the hard drive and reinstall macOS (Intel)
The final step is to erase the hard drive and reinstall macOS. You do this as follows:
- Start recovery mode by restarting your Mac and then hold down the key combination Command + R.
- Now choose Disk Utility.
- Select the disk and click Erase.
- Now fill in the correct fields. For example, under Name you choose Macintosh HD, under Structure you choose macOS Extended (journaled) or APFS and under Layout you select GUID partition layout.
- Now click Erase.
li>
Then exit Disk Utility.

If you want to sell and erase your MacBook Pro or MacBook Air with Touch ID, you can follow this optional step to delete the data from the Secure Enclave:
- Enter recovery mode. You do this by restarting your Mac and then holding down the Command + R key combination.
- The macOS Utilities window appears. In the menu bar, click Utilities > Terminal.
- Now type in this command: xartutil –erase-all. Tap enter, then type yes when prompted and hit enter again. Then choose Terminal > Quit Terminal.
You will now be back in recovery mode, where you can reinstall macOS. In our tip about resetting your Mac to factory settings, you will find an extensive guide on how to do this.
See also 


How to reset your Mac to factory settings in a few steps
In this tip you can read how to reset a Mac to factory settings. If you have an older Mac without a T2 chip or Apple Silicon processor, it works differently. We explain the old and new way.
Step 10. Clean your Mac
The inside of your Mac is now completely ready for sale, but don't forget the outside too. Gently clean the outside of your Mac with a damp, soft, lint-free cloth. Also remove any stickers and pasted items, such as protective film. You can also use a soft, lint-free cloth for the screen. You can moisten it slightly with a little water.
Don't have a new Mac yet? In our articles Buying a MacBook and Buying a Mac you will find an overview of prices for the different MacBook models and Mac models.
See also 

Buying a desktop Mac? This is our buying advice with prices and offers
Want to buy a Mac? Get all the information about Apple's desktop models, with current prices for the Mac mini, iMac, Mac Studio, and Mac Pro, in this article. In this article, we'll help you with buying advice for a Mac desktop computer that's right for you. See also 


Buying a MacBook: the buyer's guide to buying your MacBook
Do you want to buy a MacBook? In this article you will find all information about models, prices of Macbook Pro and MacBook Air, which model suits you.