These handy tips will help you make better use of various features of the Photos app on iOS. You can quickly search for the right photo, remove a disturbing background from a photo, or select a whole series of snapshots at once.
Tips for the Photos app on iPhone and iPad
We all take photos with our iPhone or iPad, so we all have to deal with Apple's default Photos app . But you can do more with the Photos app than meets the eye. For example, you can easily select multiple photos with dragging movements, you can easily see where your photos were taken and you can view photos from a specific period. After reading the tips below for the Photos app, you will get much more out of your snapshots.
- Select multiple
- Copy and paste operations
- Locations
- Search
- Years Ago
- Quick Share
- Mark
- Find Duplicate Photos
- Recover Deleted Photos
< li>Remove topic from background
#1 Select multiple photos at once
Taking a photo with your iPhone, for example, is done in no time. This can eventually fill your iPhone with a lot of photos, screenshots and more. But did you know that deleting these photos can be easier than it seems at first glance? In the Library tab and under Albums > Recently, you can see a complete overview of all the snapshots on your device. Tap Select and you can select the photos one by one. But this can also be done faster, because by dragging your finger over the photos, you can tick a whole zipper of photos. This allows you to throw them away in one go, for example. You can also delete entire collections of photos that are already grouped by default by your device. You do this in the Library section of the app. In our tip you can read exactly the steps for deleting and selecting multiple photos on the iPhone and iPad.
See also 


Select multiple photos in the Photos app of your iPhone or iPad
In this tip we explain how you can select multiple photos in the Photos app. Then you can share them, delete them or do something else with them. Without having to tap each one individually.
#2 Copy and paste operations, also on several at once
Did you know that since iOS 16 there is a trick that allows you to edit multiple photos at once? You can easily copy edits from a photo and apply them to another photo. If you select multiple photos after copying and then choose Paste edits from the menu, the filters, white balance, color correction and other edits from that one photo will automatically be applied to all selected photos. This is especially useful if you want to edit several photos in the same style, because that way you don't have to do everything twice.
You will find the option after editing a photo in the menu at the three dots. After editing, open the photo and tap the top right button, followed by Copy edits.


#3 Unpin topic from background
It may have happened to you: you have taken a nice photo of someone in which they happen to look good, but the background is not to be seen. There is a simple way to do this in the Photos app. You can separate the subject of a photo from the background. The person is highlighted and you can copy and paste it in, for example, a chat or save it as a new image. Your iPhone automatically crops out the subject and the result is often to our liking. This is really a typical feature that you need to know to use, because it is quite hidden. There is no button to crop an object, because you have to hold down the subject briefly.


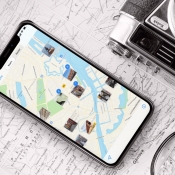
#4 See where your photos were taken
Did you know that you can quickly and easily see where your photos were taken? You can check the location of each individual photo by opening it and swiping the photo up. You will see a map with the location of the photo. The exact location is saved with every photo you take. You can also view a map from the Library tab. Choose Months or Days and tap the three dots next to a collection, followed by Show map. It's especially useful to see where you've been.
See also 


This way you can see where iPhone photos were taken
When you take photos with your iPhone, the location of each photo is saved. Where can you find that information? We explain that in this tip, so that you know exactly where the photo was taken.
#5 Manual search for photos
Many people don't know this, but you can also easily search for photos by keywords. Open the Photos app and tap Search. You can search here by place, date (e.g. a month of a specific year) or even a person's name. You do have to link people to photos in the app for this. Finally, you can even search by category, for example cars, performances, snow, animals or buildings. You can also combine multiple search terms, so that you can filter for the right results.
See also 


Searching for photos on the iPhone and iPad: this is how you quickly find the right shots
Are you looking for the right photo in your huge photo collection? In this tip we explain how you can quickly search for photos on the iPhone and iPad. By using search terms and combining them, you can quickly find the photo you are looking for.
#6 View photos from a year ago
This trick originated on the iPhone 6s, but became available on all devices shortly afterwards. With a Quick Action on the app icon you can jump directly to frequently used functions in different apps. With the Photos app, you get four options: recent, favorites, search, and photos from a year ago. Choose the latter option and the Photos app will immediately show you which photos you took a year ago. If there are no older photos on your device, you will see photos from a surrounding period. An alternative way to view photos from a year ago is to go to Search and tap A Year Ago.
See also 


View photos from a year ago with this trick
On the iPhone you can request photos from 1 year ago from the home screen. This way you can quickly see how things were a year ago, for example from your previous birthday or another moment that took place a year ago.
#7 Share photos faster
We have several tips for the Photos app if you want to share your photos. Did you take a beautiful photo or a whole collection of your holiday? Then there are several ways to distribute it. For example, you can use iCloud photo sharing. You create a group (for example with family members) and everyone can then add photos to this joint album. Anyone can comment on or like photos. In the album settings (at the button with the figure) you can choose whether subscribers can post. You can also enable the Public website option there, so that anyone with a link can view the photos.
See also  < img src="/wp-content/uploads/806295f3e101ad355e3175a817497800.gif" />
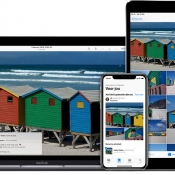
How iCloud Photo Sharing works: shared albums for your photos
iCloud Photo Sharing makes it easy to share your photos with friends and family. Shared Albums (formerly iCloud Photo Sharing) let everyone enjoy the photos you've taken. This tip tells you all about it.
If you want to decide for yourself with whom you share a series of photos, without having to share them each time via WhatsApp or iMessage, you can also do so via iCloud. You can share photos via a share link in iCloud. You must have iCloud Photo Library enabled for this, but the rest is self-explanatory. And for the closest of friends or relatives, you can even create a shared photo library that's separate from your own personal photo library. With a shared library, everyone who is a member can upload and edit photos in the highest quality, just like in your own personal library. There are therefore differences with shared albums.
See also 
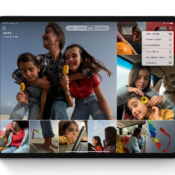

FAQ: Shared iCloud Photo Library (Here's why it's useful)
From autumn 2022, Apple will offer you the option of creating a shared iCloud photo library. Anyone can add photos and view all of the others' photos, even if someone else took them. Here's what you need to know about shared iCloud Photo Library.
#8 Mark Photos
You may know that you can edit photos by choosing a photo and tapping Edit. You can crop a photo, apply filters and do all sorts of other advanced tasks. But there is also a somewhat more hidden function called Marking. This allows you to draw on a photo. You have a pen, highlighter, pencil and an eraser. There is even a ruler to draw straight lines. Finally, you can also add text, arrows, speech bubbles and other symbols.
See also 


Create Markups in the Photos App: Draw and Add Text to Photos
Markup in the Photos app makes it easy to draw on your photos. You can also magnify items or add typed text right from your iPhone and iPad. In this article you can read how this works.
#9 Find & Remove Duplicate Photos
If you like to go out with your iPhone to take some nice photos, you always take several and choose the best one later. You can shoot almost unlimited photos with your iPhone, so by taking as many as possible you can always choose the best to keep. But a disadvantage is that your library will quickly be filled with a lot of duplicate photos. Fortunately, your iPhone can easily detect these duplicate photos. There's a separate folder at the very bottom of the Albums tab where you'll find the Duplicate Items folder. You can easily combine photos into a single saved photo, but you can also easily delete duplicate copies manually. It works with both photos and screenshots. This function does not always detect all duplicates, but it saves a lot of work.
#10 Recover Deleted Photos
Of all the tips for the Photos app for iPhone and iPad, this one will come in handy for most people. Because it may have happened to you: while cleaning up your photo library, you accidentally delete that one precious photo, from which you have such warm memories. Do not panic! Because the Photos app first puts all photos in a kind of trash can, where you can always fish them out. Photos are stored here for thirty days, after which they are finally deleted. So you have about a month to retrieve a deleted photo. You'll find this under the Albums heading and then all the way at the bottom of Recently Deleted.
See also 


How to restore deleted photos to your iPhone or iPad
Lost a photo that was on your iPhone, or deleted a photo? If you're quick, you can still find it. In this tip we tell you how to put deleted photos back on your iPhone.
Also read our general explanation of the Photos app for iPhone and iPad.
See also