

Brighten up your interior with a personal digital photo frame. No more hassle with printing photos and you always have the best ones at hand. In this article, we'll explain how you can easily turn your iPad into a photo frame.
Turn your iPad into a photo frame
A picture says more than a thousand words; that's why it's so nice to put the best memories in a photo frame. But if you use a separate frame for each photo, your whole room will be full before you know it. Therefore, use your iPad as a digital photo frame, so that you can always enjoy your best changing photos! There are several ways to turn an iPad into such a digital photo frame. Preferably use an old iPad, but it is also possible with a more recent model. No iPad at hand? Then there are also digital photo frames that you can control with the iPhone and iPad.
- Old iPad
- Recent iPad
- With apps
- Photo Frames
The photo frame option with an old iPad
If you have an old iPad lying around that is still equipped with iOS 6 or older, there is a ‘picture frame mode’ built-in. This option is called Picture Frame Mode.
To use this you can store photos locally on your iPad, but you can also use the iCloud photo library or transfer photos manually. An old iPad is ideal as a photo frame, because otherwise it will just be collecting dust in a drawer. But you could also buy a refurbished iPad, especially for this purpose.
- Set up photo frame
- Using Photo Frame
Setting Up Photo Frame
To set it up, take the following steps:
- Make sure first make sure there are photos on the iPad. The best way to do this is to import them one at a time through the Finder on the Mac or through iTunes on a Windows PC. Connect the iPad to the computer.
- In the Finder or iTunes, navigate to the device and click the Photos button. Import the photos you want to use there. Sync the iPad.
- Disconnect the iPad when it's synced.
- Open Settings on your iPad.
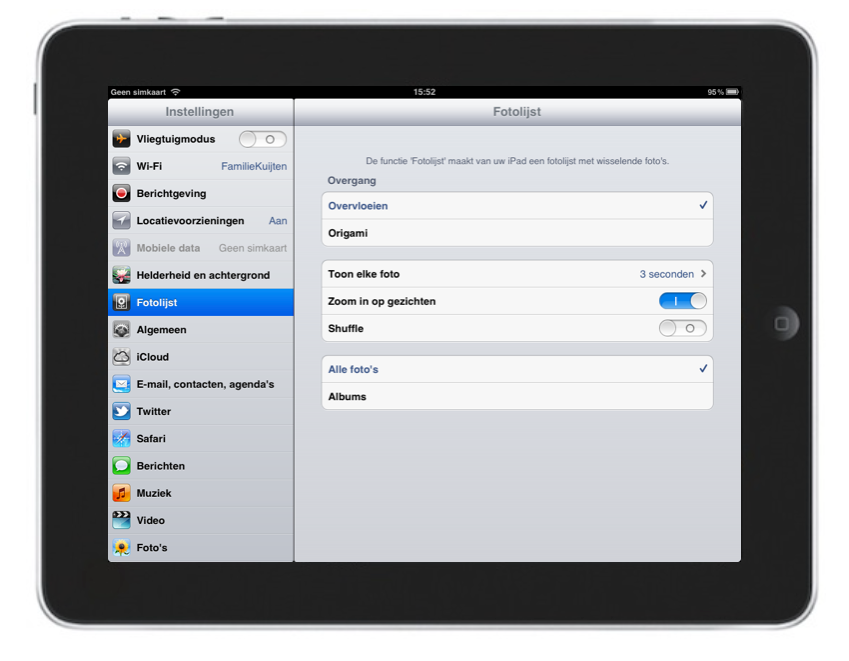
- In the left column, scroll down a bit until you see the heading Photo frame. Tap on it and then check the option.
- You can now determine the transition here, how long the photos are displayed and from which folder the images are selected.
< p>
Use Photo Frame
You can now easily turn your iPad into a photo frame with these steps:
- Make sure you have the lock screen in front of you.
- Then press the small icon to the right of the Unlock bar and the photos will appear on the screen .

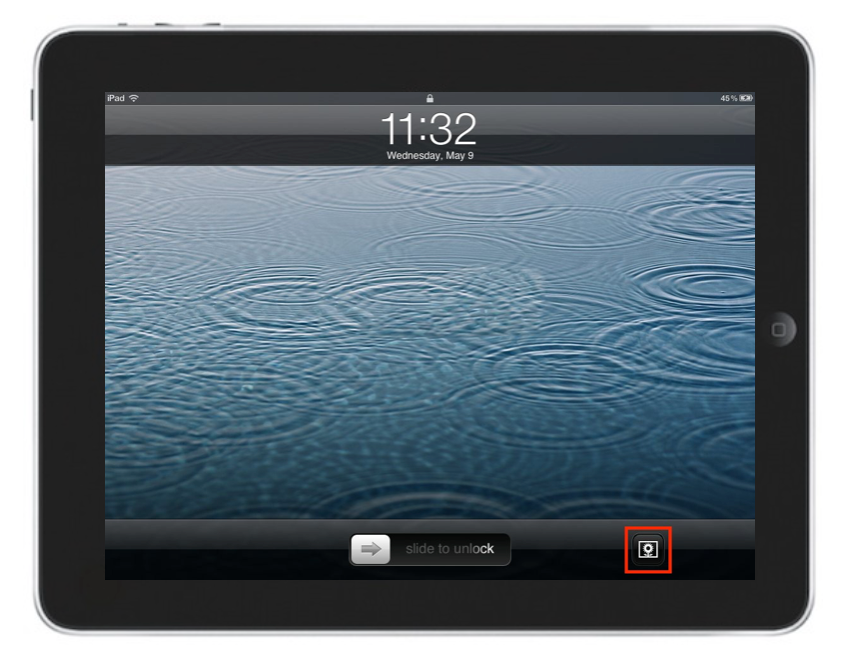
If you've set up a passcode on your iPad, you'll need to enter it first. The icon will then appear automatically.
Use a newer iPad as a photo frame
Unfortunately, with the arrival of iOS 7, the dedicated photo frame option departed. The opportunity has not returned since. Fortunately, there are other ways to achieve the same effect. With these five steps you can do that. This also works, for example, if you have an older iPad that you no longer use (such as an iPad 2 or first generation iPad Air).
Choose #1 photo source
First, determine which photo’ s you want to select exactly for your collage. For example, you can choose photos from your own photo library. In the Photos app, you can create your own album or select a shared album that you've added along with other photos.
See also 


How to create photo albums and folders in the Photos app on iPhone , iPad and Mac
Organize the photos on your iPhone, iPad and Mac! Sort them into albums and folders, so that everything becomes clearer. Learn all about creating photo albums and folders in the Photos app here!
#2 Disable Auto Lock
To prevent your iPad from turning off the screen within two minutes, you can turn off the automatic lock. You can adjust it as follows:
- Go to the Settings of your iPad.
- Move the left column slightly down until you reach the heading Screen and brightness.< /li>
- Press Auto Lock and press the bottom option Never.

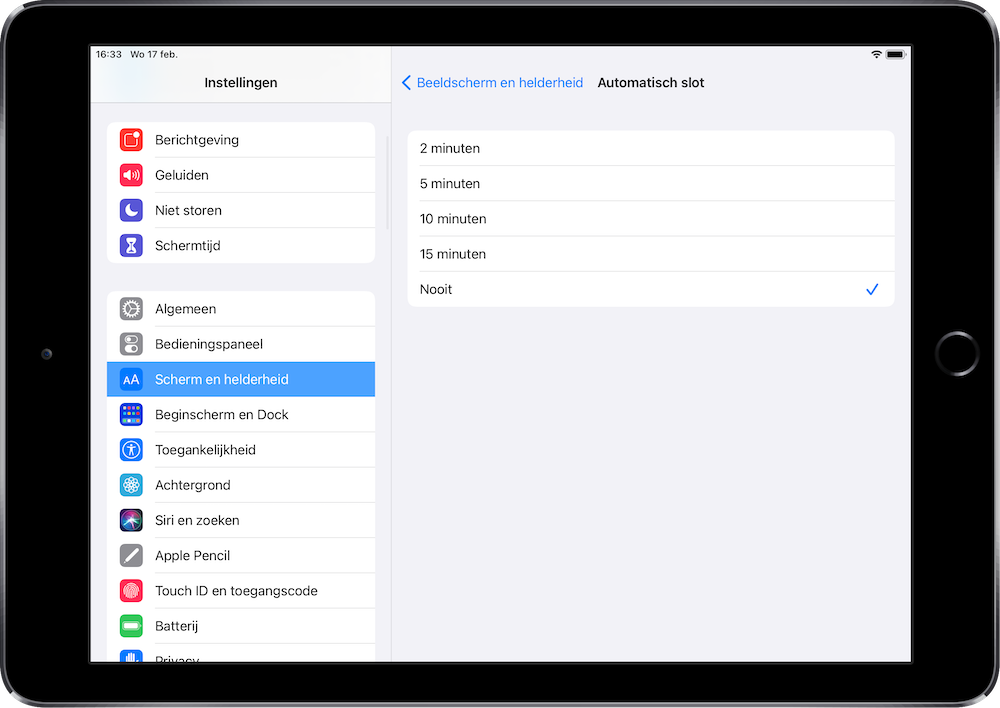
Your screen will no longer go black by itself. You can still turn off the screen with the snooze button on the side of the iPad.
#3 Lock App
Are you planning to put your digital photo frame in the living room or on the dining table? Then you don't want your guests to rummage through your iPad if you're not looking for a while. You can prevent that with guided access. This locks the screen with one of the apps you want to view the photos with. Here's how to set it up:
- In Settings, go to Accessibility.
- Then scroll all the way down to Guided Access.
- Turn on the switch under Guided Access and also make sure the Activation button is on.
< li>Under Access code settings you can also set a code with which you can enable and disable guided access. Enter a code here if necessary by entering it twice. If necessary, check Touch ID or Face ID to be able to unlock.
Guided Access also gives you the option to customize the automatic screen lock so that your iPad doesn't turn off the screen in a particular app. To activate Guided Access, triple-press the Home or Side button, then tap Start. Alternatively, you can do not disturb and turn on silent mode if necessary.
See also 


Enable Guided Access on iPhone and iPad
Guided Access gives you the ability to let kids play with an iPhone or iPad, without that they can leave an app or game.
#4 Drop iPad
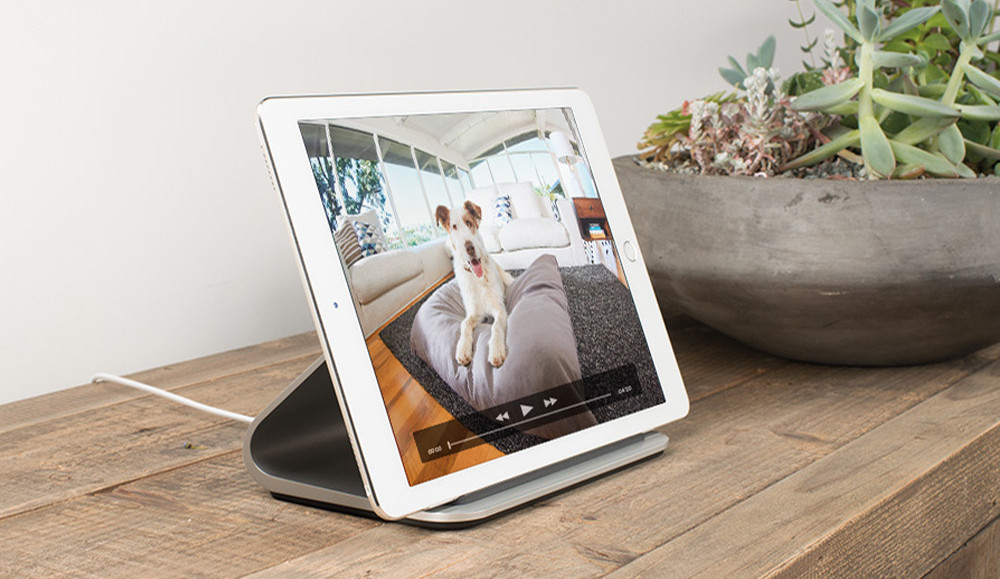
Then it's time to put your iPad somewhere. Have you already found a nice place? You can put your iPad down by, for example, rolling up the cover. Another cool solution is this holder from Logitech. It contains a Smart Connector, so you can charge your iPad while viewing photos. This way your iPad never runs out of power and it looks like a traditional photo frame.
Most holders and iPad cases are also suitable for placing the iPad. Don't forget that you also have to put the iPad on the charger, otherwise it will drain much too quickly. However, being constantly connected to power can have a negative impact on the battery. But if the iPad is a bit older and you don't use it that often, that's not such a problem.
#5 Play it!
Finally, you should do this to get started:
- Put your iPad where you want it.
- Open the app with which you want to show your photos. We just use the Photos app.
- Select the album you want to view.
- You can now enable guided access if you wish.
- Press the three dots in the top right corner.
- Press Slideshow and Enjoy!

iPad as photo frame with apps
You don't always have to use the Photos app. If you would like to highlight your Instagram feed or your photos from Dropbox on the photo frame, you can do that too. You can do this, for example, with the help of LiveFrame or Slideshows. These apps focus on your own photos, but also the photos of friends or family.
Here's a quick overview of the apps:
- LiveFrame ( Free, iPhone/iPad + IAP, iOS 9.3.5+) – Collect photos and videos from Facebook, Instagram or get them from the cloud and create a beautiful photo collection.
- Digital Photo Frame Slideshows (Free, iPhone/iPad + IAP, iOS 9.2+) – Use photos and videos from your favorite social media or cloud services to create a slideshow of your photos from scratch.
Also read our roundup of the best photo collage apps for iPhone and iPad. You then create beautiful photo collages yourself, which you can use for your digital photo frame via the steps above. img src=”/wp-content/uploads/ed424067beeb08d2cfbfd2ba90740708.gif” />
The best photo collage apps for iPhone and iPad
Turn your photos into beautiful photo collages and quickly combine your vacation photos and other snapshots. These photo collage apps for iPhone and iPad will do the trick with little effort.
Smart digital photo frame: can be operated with iPhone and iPad
Don't have an iPad to spare? Then you can also use a digital photo frame. For some households it can be the ideal solution. Especially to give as a gift, filled with photos that grandpa or grandma like. There are many digital photo frames, but we are a fan of the Aura Frames. These are digital photo frames that you can fill with an iPhone app.
If you want to give the photo frame as a gift, you only need to know the recipient's Wi-Fi address to set up the photo collection. The recipient then only has to plug in the plug and will see the photos that you have selected in advance. Perfect for people who are not very technically handy!


The nice thing is that family members can send new photos to the photo frame at a later time. You manage everything with the Aura iPhone app. You can also send photos by e-mail. The number of photos is virtually unlimited. There are five variants of this photo frame with prices between 150 and 250 euros. That is a lot of money, but still a lot cheaper than purchasing an iPad. The entry-level model is called Aura Carver and for the more expensive models you could look at the Aura Mason. Still too expensive? Then you can find cheaper digital photo frames with an app, which can be slightly less in terms of ease of use and software functions. You could also play a slideshow of photos on the iPad, making sure the screen doesn't go off.
View: Digital Photo Frames at Amazon
Prefer a cheaper digital photo frame? Then take a look at Denver's picture frames. You and your friends can choose photos together with the Frameo app and send them to the frame via WiFi. There are even hooks on this photo frame, so you can attach it to the wall. Something your iPad doesn't have!
View: Digital photo frames from Denver
We also mention digital photo frames in our overview of smart devices in the household.
See also 


Make your household smarter with these 10 accessories
If you want to make your household smarter, there are more options than you think these days. From meat thermometer to washing machine and coffee maker: everything can be operated and programmed remotely from your iPhone. We list 10 devices.