While taking a photo with your iPhone, you can manually adjust the exposure. This way, a slightly too dark photo will still look good. In this tip you can read how to adjust the exposure of photos on the iPhone before and after in the standard Camera app.
Adjust photo exposure on iPhone and iPad
Most people use the default Camera app to take photos on iPhone. Apple uses smart techniques and algorithms to ensure that the exposure is automatically adjusted to the lighting conditions. Consider, for example, the night mode for the camera on recent devices (iPhone 11 and newer). However, there may be situations where the exposure is not quite right. For example, bright sun causes the photo to be too light, while backlighting can cause areas that are too dark. Fortunately, you can manually adjust the exposure both before and after and in this tip we explain how that works.
- AE/AF lock
- Before
- After
- More about AE/AF
AE/AF lock on the iPhone photo
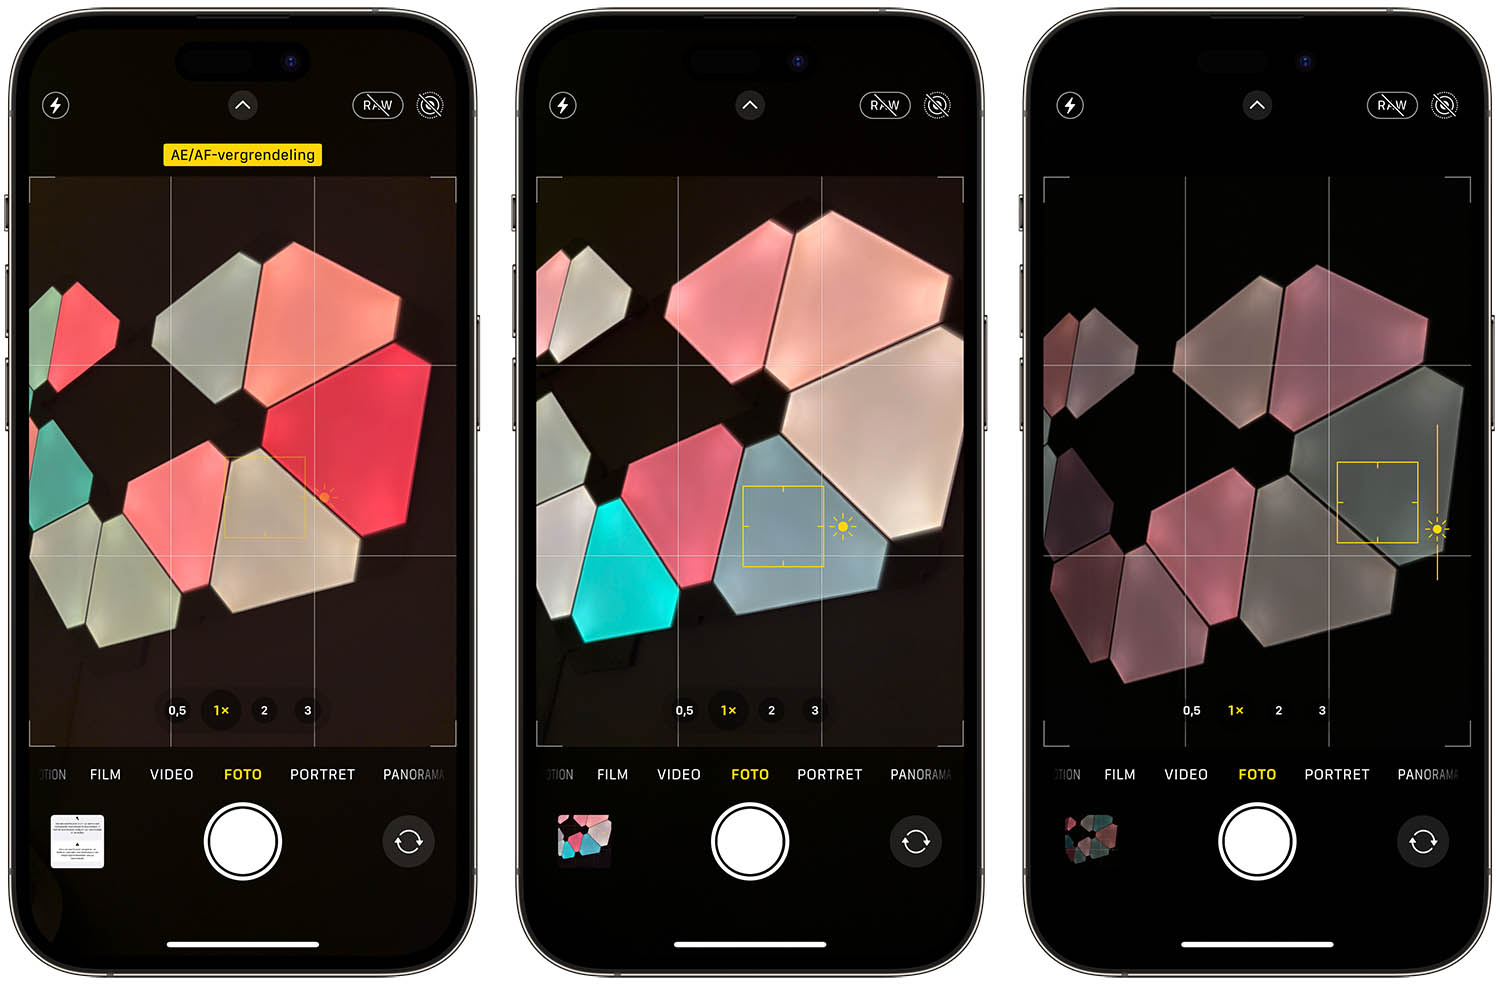
You can manually adjust the focus and exposure of a photo by tapping the iPhone screen. With the AE/AF lock function you can ensure that you keep this setting, even if you aim the camera at a different point.
How to set the AE/AF lock:
- Open the Camera app on your iPhone.
- Hold your finger briefly on the point you want to focus.
- Swipe your finger up or down to set the AE/AF lock.
- This way you can set the move the camera to a different point without adjusting the focus and exposure settings.
Note that this also fixes the autofocus. That's not always handy for close-up photos, but a creative mind always knows how to create something beautiful.

Lighting before adjusting on iPhone and iPad
From the very beginning, you have been able to move the focus point while taking a photo by tapping the screen. You can also manually adjust the exposure with this feature.
To adjust the exposure of a photo:
- While taking a photo, tap the point where you want to focus.
- A square will appear with a slider with a sun next to it.
- Move the sun up for a lighter photo or down for a darker photo.
The only drawback of this option is that the exposure is automatically reset as soon as you move the camera too much. In that case you have to tap again to set the exposure and focus the digital viewfinder. You can avoid this with the AE/AF lock, as we explained above. When the AE/AF lock is fixed, focus and exposure are permanently fixed at the point on the screen that you specify.
A nice trick you can use with the iPhone camera is to take long exposure photos, so you can see ‘streaks of light’ gets. We explain how this works in the tip below.
See also 

How to take long exposure photos on iPhone < /h3> In long exposure photos, the photographer leaves the shutter open a little longer, which gives you nice stripes or blurring. This is also possible on the iPhone, thanks to this trick.
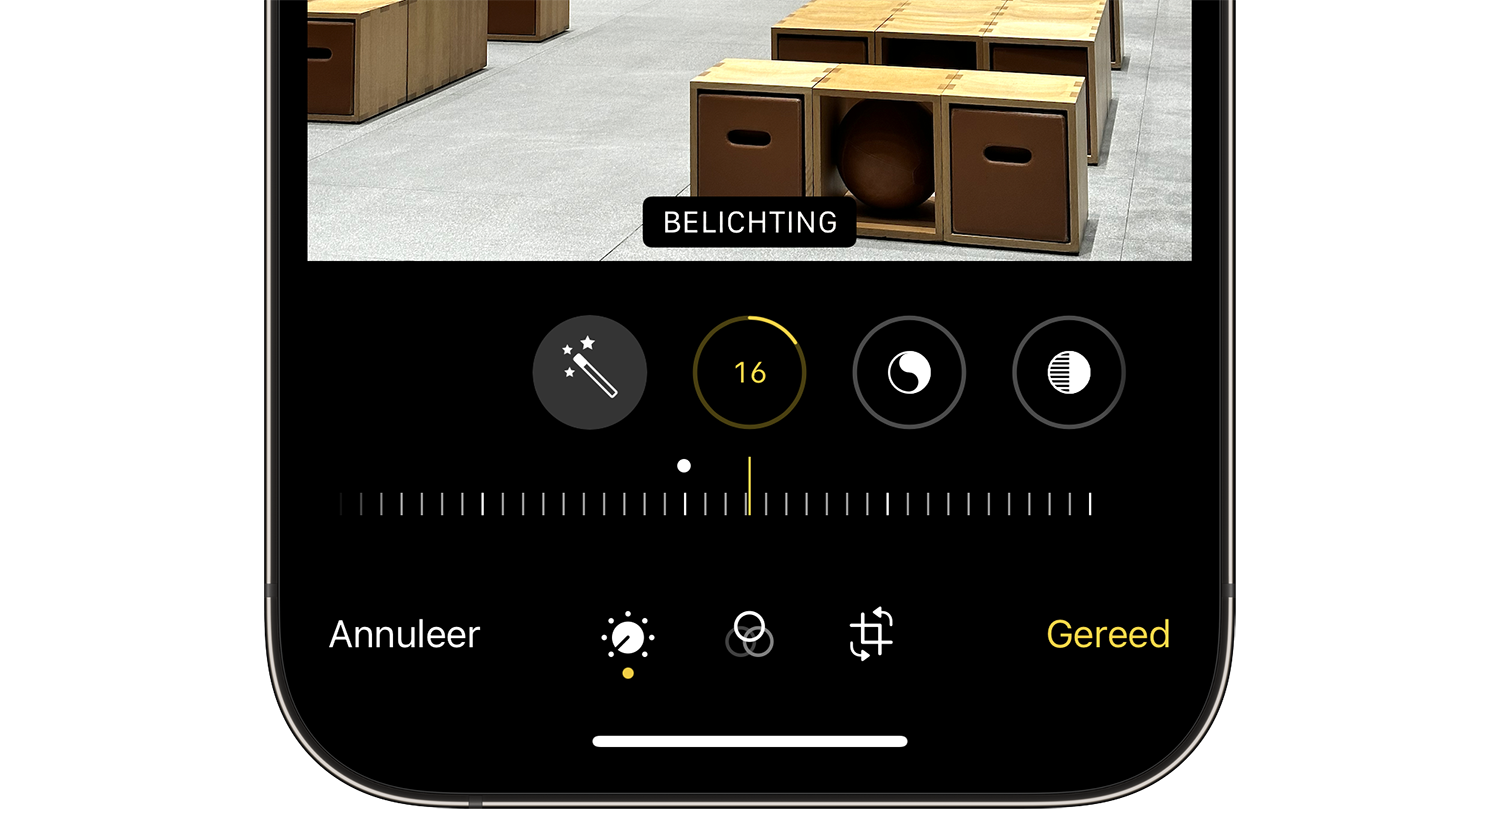
Adjust exposure afterwards
You can also adjust the exposure of a photo afterwards. This works like this:
- Open the photo you want to edit in the Photos app.
- Tap Edit at the top right.
- Bulbs with different settings will appear at the bottom of the screen.
- Tap the second bullet (see image) and choose Exposure (or one of the other exposure-related options, such as Brightness).

More about AE/AF lock
You will often find dedicated buttons for AE and AF lock on DSLR cameras. Beginners often don't use them because they have no idea what you can do with them. You will also find such (software) buttons in the Camera app of the iPhone. You saw how to fix it at the beginning of this article. In addition, you will often find a button for FE lock on DLSRs, with which you can fix the flash settings.
AE stands for Automatic Exposure. With this button you ensure that the exposure (shutter speed and aperture) are fixed. This is useful if, for example, you want to take a series of photos or a panorama and always need the same exposure. It also comes in handy in low-light situations.
AF stands for Autofocus and is the easiest to understand, even for beginners. This is also set automatically as soon as you take a photo. If you still want to lock to a different setting, you can. On a DSLR, you usually engage AF lock by half-pressing the shutter button. This is useful, for example, if the object you want to photograph is on the side of the image. You can then ensure that the focus is always on this object.
Don't feel like fussing and just want a well-exposed photo? Then use the night mode in the Camera app. This mode does a lot of the work for you. It works on iPhone 11 and newer.
See also 

How iPhone night mode works
iPhone camera night mode also lets you take sharp pictures in the dark. Read everything here to take beautiful photos with Night Mode, even in low light. And on newer iPhones, night mode is even more useful.