Playing back your recorded videos just to find out some of them have that dreaded camera shakiness? Sometimes, no matter how good your handiwork is, situations happen where your video comes out a bit off-kilter. This can make your video look less professional, be distracting, or blur your subject – all things you want to avoid.
The creators of the video editing software Adobe Premiere Pro foresaw this situation and graciously included a method to stabilize your shaky footage in post-production. It works very well for minimal to medium shakiness and can really make your final piece look yards more polished. In this Premiere Pro tutorial, we’ll show you how to apply and use this stabilization effect during video editing.
Table of Contents


How to Stabilize Shaky Video
Before starting, you’ll want to make sure the video clips you’ll be using are imported into Premiere. Go to the Media Browser. Search your computer for the video files you’re using. Select and drag the files into your timeline. They will automatically be imported into the project files as well.
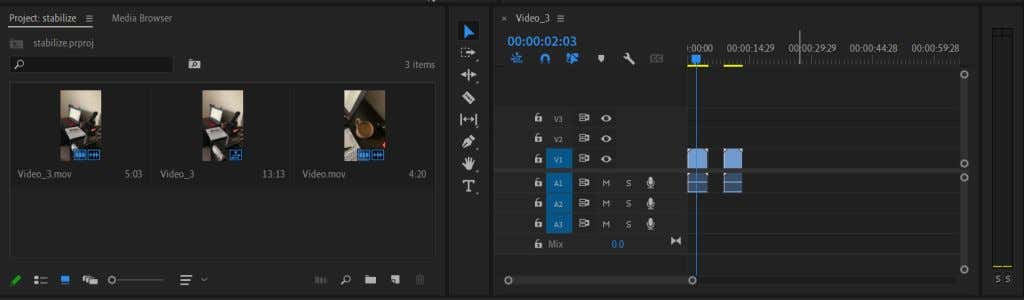
Now that you have your clips imported and in your timeline, you can begin to stabilize them using Warp Stabilizer in Premiere. Follow these steps to do so.
- Decide which clip(s) you need to be stabilized and select it.
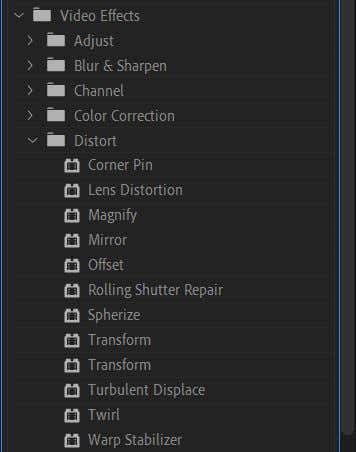
- Go to the Effects panel, and go to Video Effects > Distort > Warp Stabilizer.
- Click and drag it onto the clip and the effect will be applied.
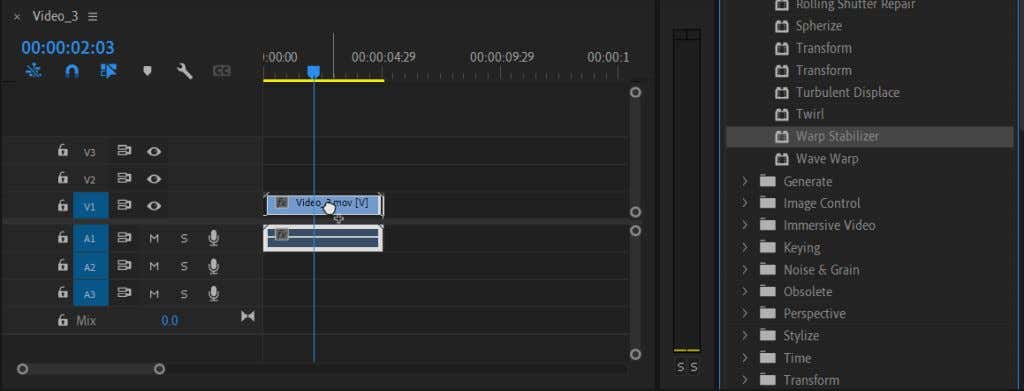
Premiere will take a few seconds to analyze the video and then stabilize it for you. You can then play it back in the Preview panel to see if you like the results. If something is off, there are a few ways you can edit this effect in the Effect Controls panel to make it look exactly the way you want.
How to Edit the Stabilization Effect
If you want to change anything about the stabilization effect, such as the movement, method of stabilization, borders, scaling, or more, you can change these in the Effect Controls. Here’s how to use these controls.
- Navigate to the Effect Controls panel.
- Look under your Warp Stabilization effect and open the dropdown if it’s not already.
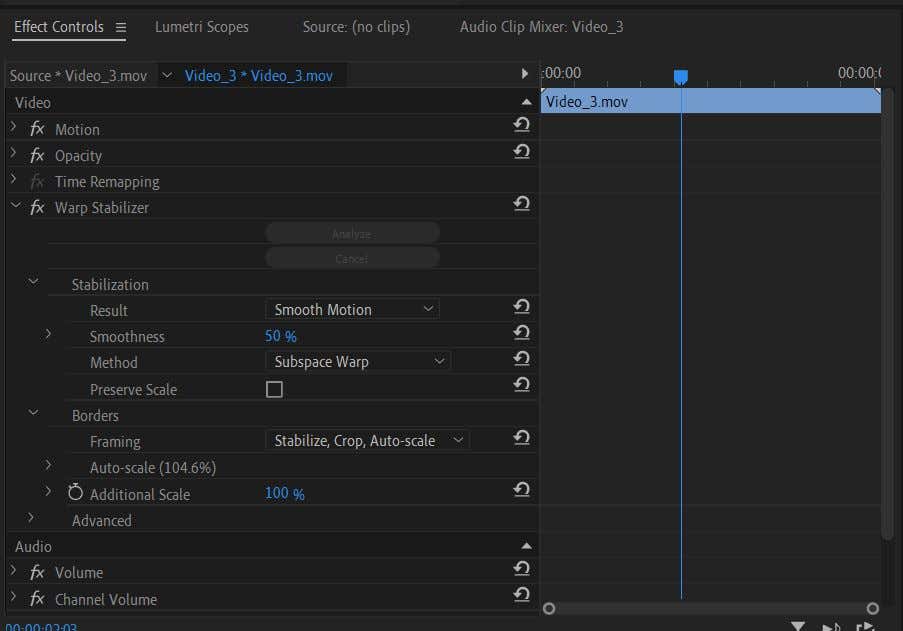
Here, you’ll see a few options you can change to get a different stabilization effect.
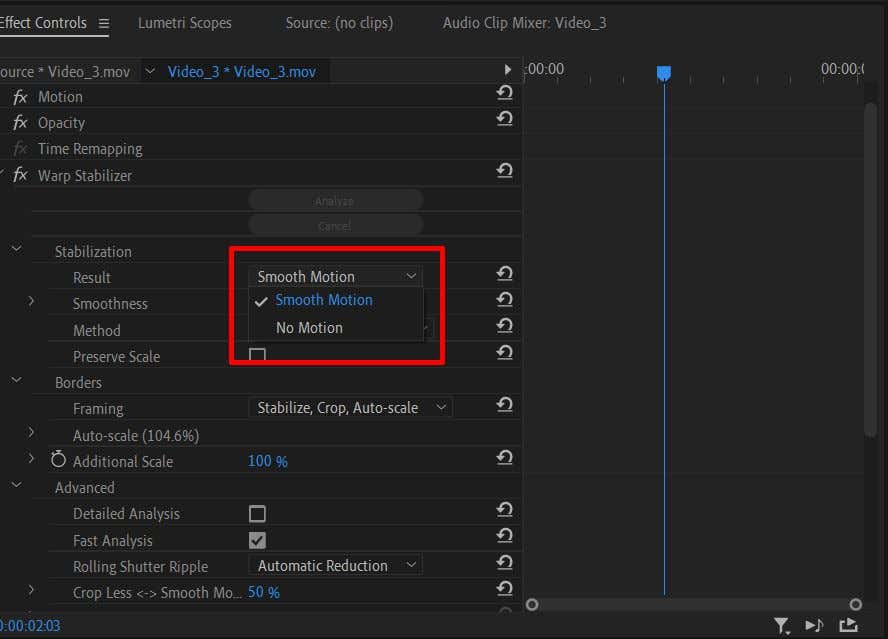
Stabilization Dropdown
The first option here is Result. This is the type of motion you want the effect to have on your video. You can choose either Smooth Motion or No Motion.
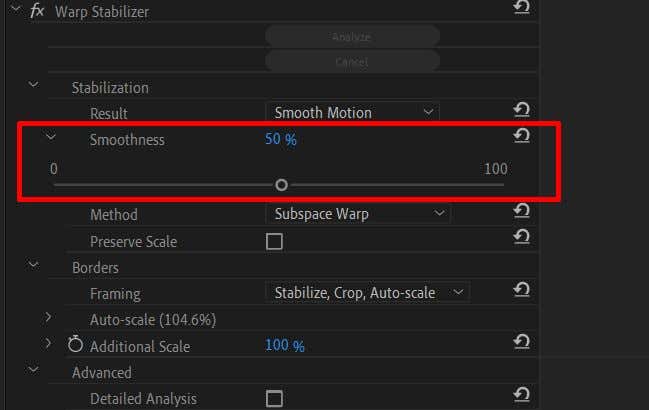
Next, you can change how smooth the motion is. If you want a bit more of a subtle stabilization effect, you can change this Smoothness effect to a lesser value.
Then there is the Method option. This is an important aspect of using the Warp Stabilizer effect, as each stabilization method can be useful in different types of situations.
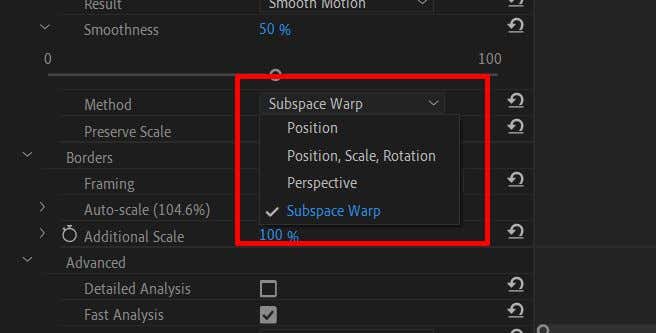
The Position method uses only position data within your video to stabilize it.
The Position, Scale, and Rotation method uses data from all three of these to stabilize your clip.
The Perspective method will corner pin the frame of your video to stabilize the tracking of the shot.
The Subspace Warp method stabilizes only parts of the video that it analyzes to be shaky to make the whole video more uniform.
By selecting the correct method for your clip, you’ll get a more natural-looking effect. For instance, when using Warp Stabilization, you don’t want a video that, while looking smoother, still has too much movement and distracts from the subject. If you try all the methods available and the video clip still looks like this, it may be too shaky to save.
The Preserve Scale check box underneath Method will retain the scale of your original footage. Sometimes, using a specific Method will alter the scale of footage to get a better result. You can check off Preserve Scale, but it may cause the video to look off. But this depends on the clip itself.
Borders Dropdown
When using Warp stabilizer, Premiere will alter the borders of your video by cropping them to achieve better stabilization. However, if you notice black bars around your video, go to the Framing section to make adjustments.
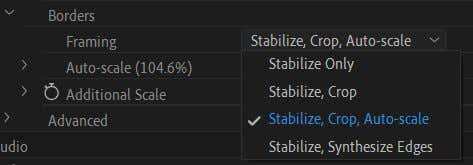
If you have the Stabilize Only option selected, it’s the likeliest reason behind the black bars. Unfortunately, Premiere doesn’t scale the video to take them out, so you’ll still see them.
The Stabilize, Crop option can cause even more pronounced black bars. In addition to stabilization, it also crops the footage to get a more stable effect yet doesn’t scale the footage to hide the crop.
If you select Stabilize, Crop, Auto-Scale, Premiere will scale the footage to take out the bars. As a result, though, this can result in a low-resolution video.
If you select Stabilize, Synthesize Edges, Premiere will add pixels based on your video and remove the black bars. However, this option takes more processing power. However, know that choosing this option will disable the auto-scale section as well as Crop Less Smooth More.
Below the Framing dropdown, you’ll see Auto-scale. This tells you how much your video has been scaled. You can open this dropdown to change the Maximum Scale level. You can also change the Action-Safe Margin, which will add a border to the video.
You can go down to change the Additional Scale and scale the video even more if you wish.
Advanced Options
Here are a few options you’ll want to keep in mind to get better stabilization.
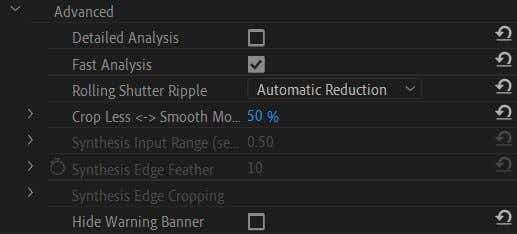
First, there is the Detailed Analysis checkbox. If you turn this on, Premiere will do a more in-depth analysis to get you a better stabilization effect. However, this will use more processing power and cause longer render times.
If you chose the Synthesize Edges option under Framing, you could also change the Input Range here to determine how much of the video both forward and backward in seconds Premiere will use to create new edges from.
You can also choose to hide the warning banner here that appears while the video is being stabilized.
Get Smoother Shots Using Warp Stabilizer in Premiere
Shaky video is one of the last things you want in your video project, but accidental camera movement can be hard to avoid at times, especially when shooting handheld footage. Thankfully, filmmakers and video editors can count on Adobe Premiere Pro CC to help with video stabilization if they use the warp stabilizer. It makes the stabilization process simple and can save video footage.