
Ever wanted to keep two folders in two different locations synchronized in real-time? Maybe you have one folder on your desktop or laptop and you want to sync it with another PC in your home or to an external storage device like a USB hard disk or to a network attached storage device (NAS)?
There are lots of freeware programs out there that can help you sync two folders, but very few of them do a good job of syncing the folders in real time. What I mean by real-time is that the user doesn’t have to manually open the program and run the synchronization or have to wait for the program to run on a recurring basis.


In this article, I’m going to write about a freeware program that you can use to setup real time syncing between two folders stored in different locations. This is useful for backup purposes or if you are working in a team and want to avoid a cloud service like Dropbox or Google Drive.
Dsynchronize
Dsynchronize is a freeware program written by some developer in Poland whose website looks like it is from the 1990’s! However, don’t judge a book by its cover because the programs he writes are excellent.
Firstly, when you visit the above link, you have to scroll down a bit to get to the correct program. At first I thought I was on the wrong website because I kept reading about his first program called Dspeech. Scroll down past that and past Dshutdown and you’ll see Dsynchronize.

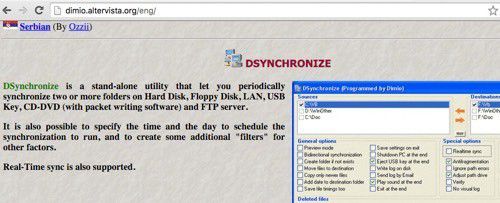
As previously noted, it’s a pretty bad looking website. Thankfully, the software is clean and doesn’t contain any junkware, malware, ads, etc. Once you download the ZIP file, go ahead and extract all the files and then run the application file.
When you first run the application, you’ll see two boxes at the top for source and destination. We need to configure those first.


Check the box for Sources and then press Enter. You’ll now see two buttons appear at the right: Filter and Browse.

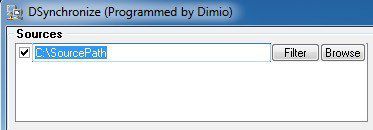
Click the Browse button and choose your first folder. Once selected, you can click on the Filter button if you want to exclude certain types of files or to exclude subfolders. If you want everything synced, then don’t worry about the filter button.
Now that we have our two folders selected, we can start configuring the options. By default, syncing will only work when you click on the Synchronize button. According to the documentation, you should perform a normal sync first before you enable real-time syncing.

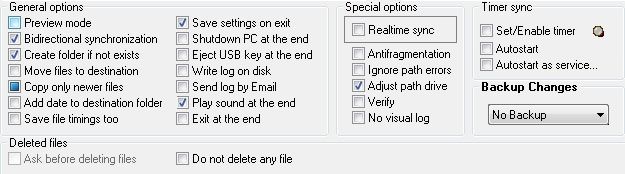
However, before we perform any sync, let’s configure the options. To start, if you want to keep changes synced between both folders, you should check Bidirectional synchronization. This will automatically enable the Copy only newer files box too. I also recommend checking Create folder if not exists so that when you create a new folder in one folder, it will automatically create the same folder in the other synced folder.
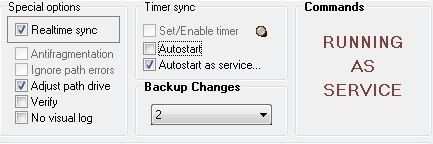
Another important option is Backup Changes. This is useful, if you want to keep several versions of the changes in case you didn’t mean to delete something or you want to see previous versions of a document, etc.
There are several more options, which are self-explanatory. If you are confused, make sure to read the TXT file that is located in the folder where the application was unzipped.
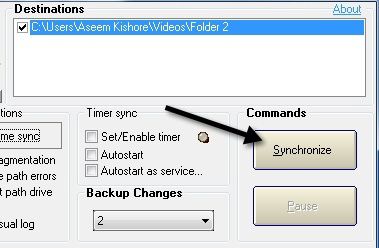
Go ahead and click the Synchronize button to complete one sync. Once you have done this, you can now make some changes and then do another sync to make sure it’s working the way you want.

In order to get the real-time sync, you have to check the Realtime sync box under Special options. Now if you leave the program window open and start adding, removing or updating files in the source or destination folder, you’ll see that the folders are updated automatically without any user intervention.
This is still not ideal because you have to keep the program window open, but the developer was smart enough to understand that. Under Timer sync, there are two more options you need to check: Autostart and Autostart as service.
When you try to check the Autostart button, you will get a message saying you have to start Dsynchronize as an Administrator. In order to do this, close the program and then right-click on the application file and choose Run as Administrator.


Now you should be able to check the Autostart box without the message. Next, check the Autostart as service box and you’ll get a popup where you have to click the Install Service button.

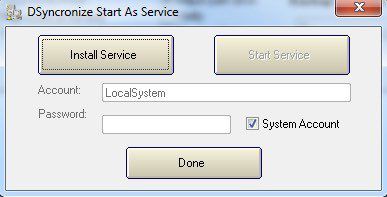
Once you do that, the Start Service button will become clickable. Click on that and don’t worry about Account, Password, etc. Just make sure System Account is checked. Click Done and you should see the program now says it’s running as a service.

That’s it! Now close the program and start updating, adding or deleting data from your folders and watch as those actions are instantly synced to the other folder.

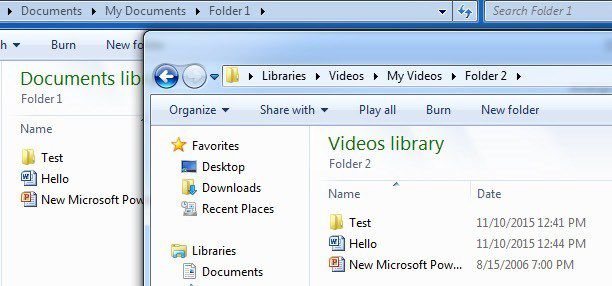
Overall, the program worked really well in my tests and I was impressed with the speed and also the fact that I could keep backups of the changes and see a log file of everything that was updated, added or deleted. If you have any questions, feel free to post a comment. Enjoy!