
Whoops! You just formatted your digital camera memory card by accident and now all of your pictures are gone! Or maybe your card became corrupted and none of the pictures can be read anymore? Unfortunately, losing or deleting pictures from a memory card is a very common problem simply because sometimes people simply press the wrong buttons on the camera!
Luckily, there are many software applications that can help you recover your lost digital photos. Pictures can be recovered because when a photo is deleted from a memory card, the link to the photo is removed, but not the actual data.
You can think of it this way: you go to a library and look up a book in the database, but don’t find any information. Maybe the book was new and had not been put into their online system yet, but the physical book is still in the library, you just can’t find it easily.
Photo recovery programs ignore the link and read all the books in the library and just spit them back out for you. They usually work very well unless some serious damage has been done to your card. In this article, I’m going to mention a couple of programs I used on a test set of data and show you how well they performed. Also, check out our YouTube video above that goes over some methods to recover data from an SD card.
I basically copied a couple of folders of pictures onto a memory card and then deleted the photos using Windows. Then I tried each program to see how many photos they could recover.
Note: If you just want to see which programs worked best, skip down to the conclusion and then read the section on that particular program and how to use it.
The programs I’m going to mention here are best used to recover data from an SD memory card or from a flash memory device like a USB stick. If you want to recover files off a computer hard disk, check out my previous post on recovering accidentally deleted files, which uses a different program.
Pandora Recovery
Pandora Recovery has a free photo recovery tool that can be used to recover photos from a variety of devices. Go ahead and download and install it. Once you open it, you’ll see a wizard pops up automatically. Uncheck the box for the wizard, which will then take you to the main interface.


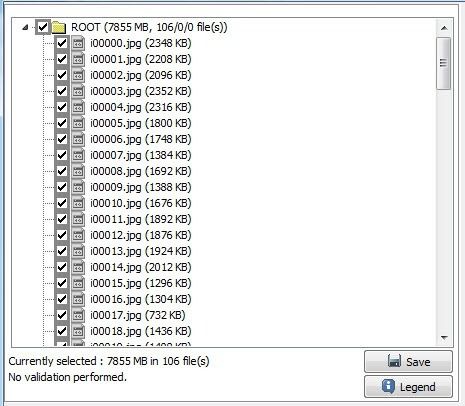
Click on your memory device in the left hand side and it will start performing a scan automatically. If you’re lucky, the top box will start filling up with the name of the images that were deleted. In my test, I deleted about 105 pictures from the memory card and it found 128!

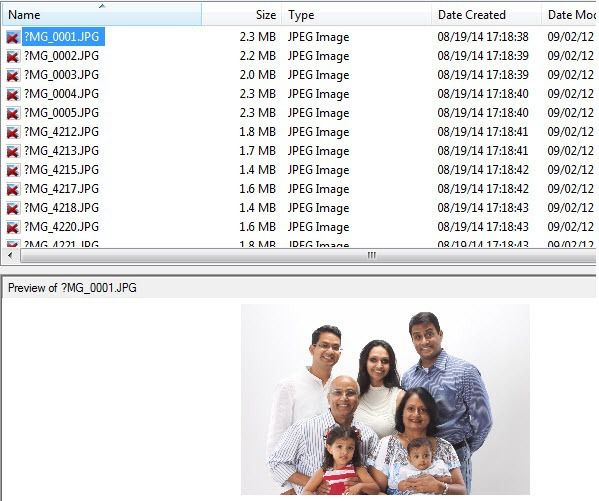
You can click on the files at the top and it will show you a preview of the image, if it’s possible to recover. Now to recover the photos, go ahead and use the SHIFT key to select all the photos in the top box and then click on the Recover button, which is the small little orange trash icon. This will bring up the recover dialog box.


Choose a folder where you want the recovered files to be kept and click Recover Now. Make sure the location for the recovered files is not in the same location as the deleted files. Now give it some time and you should see your images being recovered!

Once finished, which took about 10 minutes, I got back about 80 out of 105 pictures that were originally stored on the card. Not too bad, but I was hoping for more. There were actually more pictures recovered, but for some reason the other ones could not be opened. Let’s try another program.
Zero Assumption Recovery
ZAR (Zero Assumption Recovery) is also free for recovering photos. It’s still a trial version you have to download, but for whatever reason, they made the image recovery part of the program free. Once you install it and run it, you’ll see the main interface.

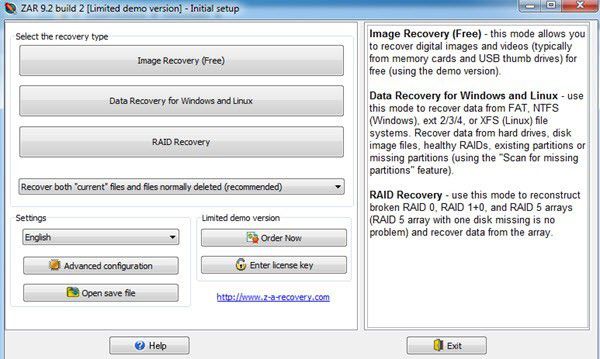
Click on the Image Recovery (Free) button to get started. It will list out the devices connected to the computer, so go ahead and choose your memory device and then click Next.


Now you’ll see a nice little map of your drive broken down by data sectors. As the program scans the drive, it will color code the sectors according to data fragments, nothing interesting, file system structures and bad sectors.

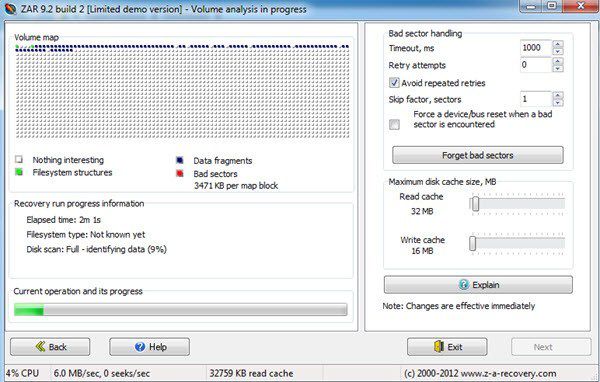
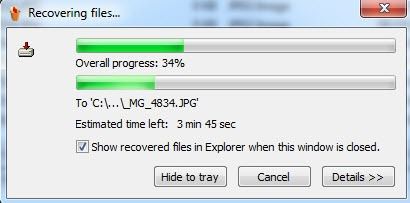
At this point, you just have to sit back and wait. ZAR took about 20 minutes, so twice as long as Pandora. When completed, you get a list of photos that can be recovered. Go ahead and check the root box so that all the images are checked too.

Click the Next button at the bottom right (Not the Save button below the file list) and choose a destination for your recovered images. Then go ahead and click on the Start copying the selected files button.


Once completed, go check the folder and hopefully you’ll be as happy as I was. The program was able to recover all 105 out of 105 images! The program took longer, but it was well worth the wait! So far ZAR, the results were 100% recovery in my small test. Let’s try more programs.
Undelete 360
Undelete 360 is our third program for the photo recovery test, so let’s get into it. Once you install it and run it, click the Search button at the top and select the drive you want to recover data from and then click Start.

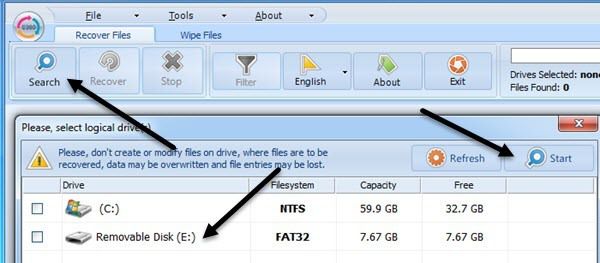
Within just a few seconds, the program told me there were 105 files to be recovered and even gave me the status, which was Very Good. The only annoying thing about the free version is that it makes you select each file individually, so if you have a lot of pictures to recover, you’re going to be clicking for a while unless you buy the paid version. Anyway, once selected, go ahead and click on Recover.


Select a location where you want the recovered files saved and then click Start. I didn’t select any of the options just because I wanted as much of the image data retrieved and didn’t really care about the other stuff.


So what were the results? Well, they were the same as Pandora. Undelete 360 recovered only 80 out of 105 images and the unrecoverable ones were the same as for Pandora. So it seems those 25 pictures had some issue, but Zero Assumption Recovery was able to get them back with its slow and steady recovery. Undelete 360 only took about 5 minutes to run, so the fastest, but not the best results. Let’s keep looking at more programs.
PhotoRec
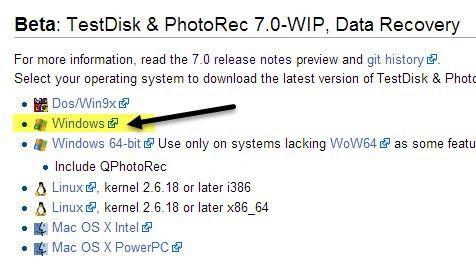
PhotoRec is an interesting free photo recovery tool because it has a version that runs in the command prompt and also a graphical version, but that version only runs on 64-bit Windows. Also, the GUI interface has fewer features, so you should try to use the command prompt version. In my tests, the command prompt version also recovered more of my pictures too. I’m not sure what the difference is, but it is significant.
When you go to the download page, make sure to download from the link that just says Windows and not the 64-bit version.

Once you download it, unzip it and click on the photrec application in the testdisk-7.0-WIP folder. Note that this is the 7.0 version, which is still in beta, but worked great for me.


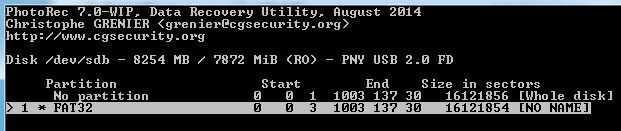
Now here’s the fun part. Once the command window pops up, it will instantly display a list of drives on your computer. You need to pick the one that is for your memory card or USB drive. Use the arrow keys on your keyboard to move up and down and press Enter to select. The interface is a little scary looking, but it’s not all that bad. Plus, it managed to recover all 105 photos in just a few minutes.


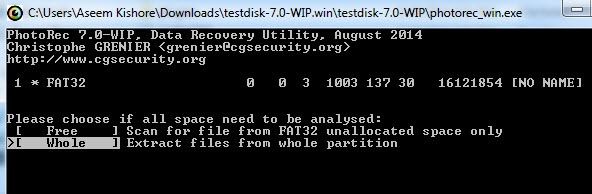
As you can see above, my USB drive is 8GB and it’s called PNY USB 2.0, so that’s what I selected. On the next screen, I was a bit confused myself. Looks like you have to pick the one that says FAT32 or FAT16 or whatever line has the file format for the drive. In my case, it was FAT32, so I selected that one instead of the No partition one above it.

On the next screen, it’s a bit confusing because you have to choose the filesystem type, but I kept trying to go to the right and select FAT/NTFS, etc, but it would not work. Then I figured out the two options are [ext2/ext3] and [other]. If the drive is in any FAT or NTFS format, make sure to select Other. If you don’t know for sure, it’s probably going to be Other, so just choose that.


Now you’ll be asked if you want to scan on the free space or the whole drive. I would just go with Whole as to avoid having to run the software again. May as well get everything and then just keep what you need.

On this last screen, you have to choose the destination for the recovered files. By default, it starts you off in the directory where the program itself is installed. To navigate around, move down to the directory with the [.] and [..] in the name. The one dot is the current directory, so if you want to save the files there, you highlight it and then press C. The two dots will move you up one directory. You can then select any folder and press C.


It’s a little confusing, but once you understand how it works, it makes sense. Now the program will start and you should hopefully see the number of recovered photos go up!

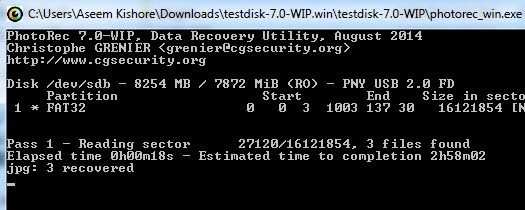
As I mentioned earlier, the command prompt version was able to recover all 105 out of 105 images in just a few minutes. So it was the fastest and it was able to recover 100% of the pictures. Definitely a good choice, but wish the GUI interface version could do the same thing as the DOS-based version. Now for the last program.
EaseUs Data Recovery
I left EaseUs Data Recovery for last because even though it’s free, it only lets you recover up to 1 GB in data for free. All of the other programs let you recover unlimited data, which is really nice. After you install it, you’ll notice the interface is a bit different.

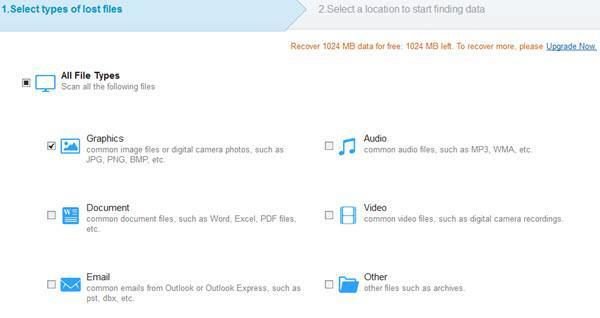
Firstly, you choose what types of files you want to recover. By default, they are all selected, but since I only had pictures on my drive, I chose Graphics. Next, you have to pick the drive you want to scan.


Click the Scan button and the program will start recovering deleted photos. You’ll see them pop up in a list on the right hand side. Go ahead and click on the checkbox at the very top to select all the files and then click on Recover. As you can see, it said there were 105 images found, now let’s see if it can actually recover all of them.

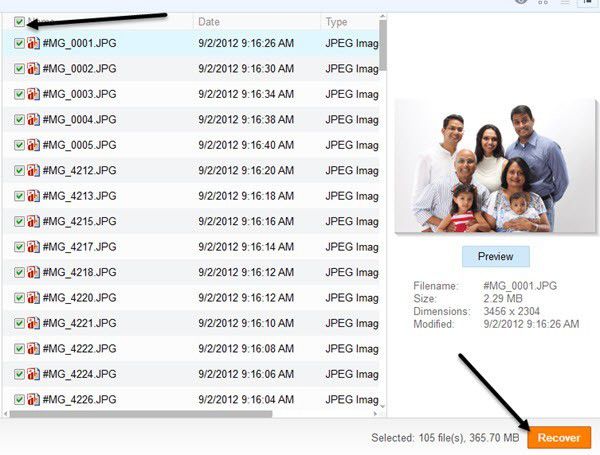
Unfortunately, EaseUs could only recover 80 out of 105 images also. The other 25 images were again there in the folder, but could not be opened. So that’s 5 free photo recovery programs reviewed! Let’s summarize.
Conclusion
So with this simple test, we can quickly see which photo recovery program did the best job. Out of the 5, it looks like only 2 were fully able to restore all the 105 images that were originally on the drive.
Pandora Recovery – 80 out of 105 images – 10 minutes
Zero Assumption Recovery – 105 out of 105 images – 20 minutes
Undelete 360 – 80 out of 105 images – 5 minutes
PhotoRec – 105 out of 105 images – 5 minutes
EaseUs Data Recovery – 80 out of 105 images – 3 minutes
So your best option is to try Zero Assumption Recovery first, since it has a nice GUI interface, even though it’s a bit slow. After that, it’s PhotoRec with the best reliability and speed. If you have a huge SD card or USB drive, I would suggest PhotoRec since it will probably save you a lot of time. If you have any questions about any of the programs, leave a comment below. Enjoy!