
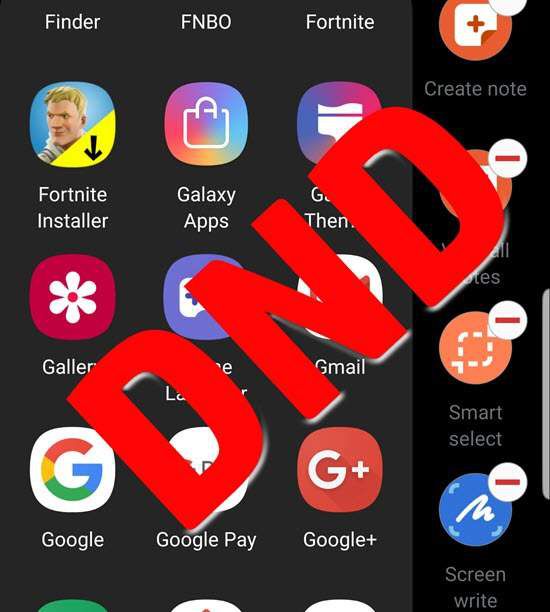
By default, Android’s Do Not Disturb (DND) does exactly what you’d expect the so-named feature to do—no matter what app, call, email, or text message tries to find you, the operating system (OS) waits until you turn DND off before displaying and/or playing and/or vibrating a notification.
But what if you’re expecting an important call, or perhaps awaiting a critical payment notification from PayPal? Or what about that much-anticipated text from that one person you want to talk to no matter what you’re doing?

The good news is that the OS provides—via a subset of DND—extensive
controls over what data, from which app, right down to from whom, actually pierces
the DND veil, and when. But before looking at and modifying the behavior of
DND, let’s start by making sure that the Notifications function itself is set
up optimally.
Nullifying Nagging Apps
Nearly every app has one thing or another it wants to notify
you about, some of them excessively so. I don’t know about you, but I don’t
need to be told immediately when my online banking app has a policy change or each
time an update has become available for every single app on my phone. Frankly, in
my opinion, only a few of my apps have anything critical to say.
I don’t suggest the following procedure for every app you have installed, but primarily for those for which you receive unwanted notices and want to stop them.
Note: For this procedure
and any other in this article, procedures and location names may be slightly
different based on your Android version and the maker of your phone.
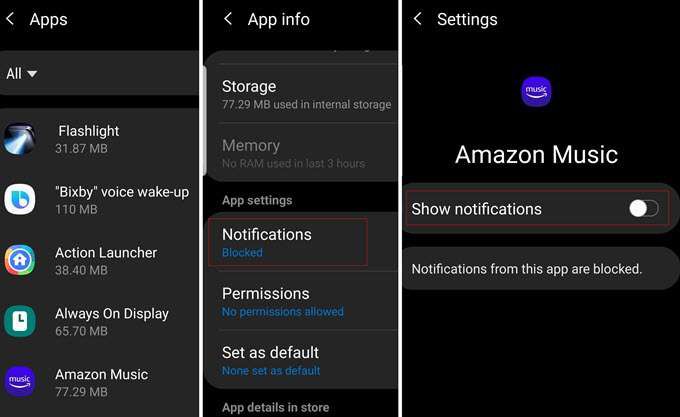
- In the All apps list, scroll to the one you want to
change notifications for and tap it to open it. - Scroll to Notifications.
If notifications are on, the app will be labeled Allowed, if not, the label will say Blocked. - Tap the app name and use the toggle button to set the
desired notifications setting.

Controlling DnD with Priority Mode
Essentially, what Do Not Disturb does is disable Android’s Notifications system, until, that is, you set up parameters to poke holes in the DND barricade.
It’s important to note that not all phones and OS versions use exactly the same terminology. On my Galaxy, for example, we’ll be working with DND Exceptions. Part One in the procedure, then, is to activate DND, as follows:

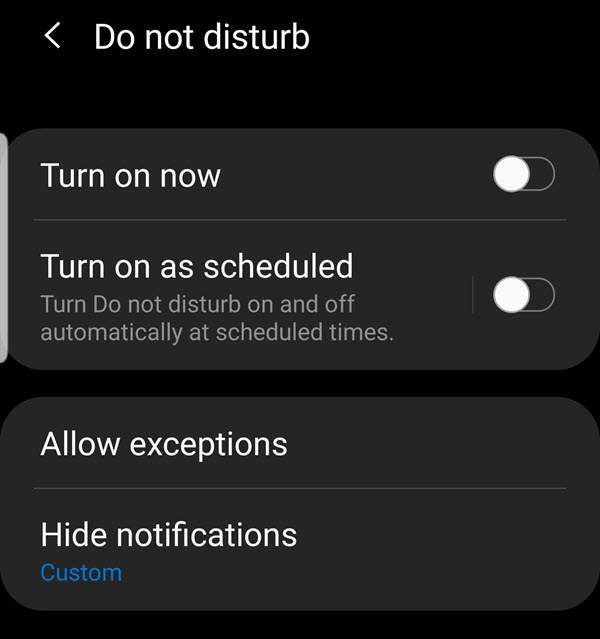
Tapping Turn on Now, of course, puts the device in DND mode. You can set up parameters with Allow Exceptions.
Scheduling DnD Mode
As it does with just about any event, Android lets you set up DND to start and stop at specific times on each day of the week. Tapping Turn on as Scheduled (or its equivalent) will display a screen similar to your calendar app’s event scheduling screen, as shown here:

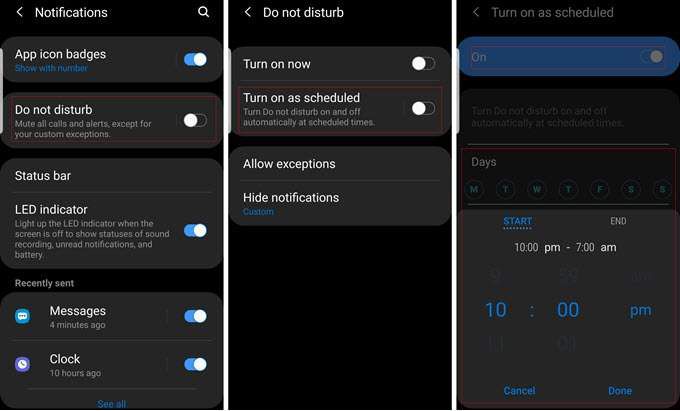
From here, after turning on scheduling, you can set which days you want DND to run and start and end times. On some Androids it may be different, but on my Galaxy Note 9, I cannot set different activation periods for specific days; it’s a one-fits-all scenario. I can, however, turn off DND whenever I want with the Turn on Now/Turn off Now toggle mentioned earlier.
Setting DnD Exceptions
There’s great comfort in having the ability to tell your phone, “Don’t bother me between 10 PM and 6 AM,” and then disappear for the night. But there are oh so many possible important events that we turn our backs to at the same time.
Isn’t telling your phone, “Don’t bother me between 10 PM and 6 AM—unless Jackie calls,” all the more comforting? How about, “Hold all calls, texts, and emails, except those from my daughter’s maternity room at the hospital.”
You get the idea. DND is much
more effective when you don’t have to worry about what you might miss.
Depending on your phone, you set up exception rules in a subsection of Do Not
Disturb, which is accessible via Notifications in Settings, as follows.
- Go to Settings
on your phone (either drag down from the top of any screen and tap the Settings (gear) icon or tap Settings (also a gear icon) in the app
tray. - Choose Apps
& Notifications, or if you’re using a Samsung or another device with
“Apps” and “Notifications” in separate subsections, choose Notifications. - In the Notifications panel, tap Do Not Disturb. Depending on your phone, what you see here may
differ some, but among the options is an
Allow Exceptions or something equivalent. Tap that.

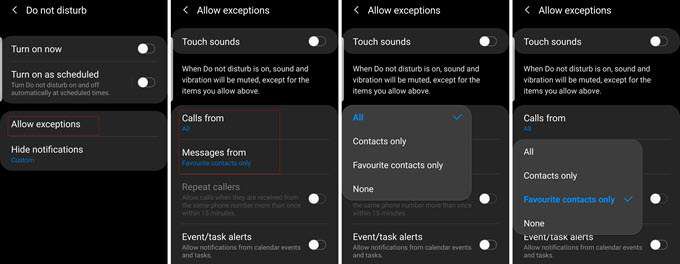
Notice
the different types of events, such as calls, text messages, event and task
alerts, and reminders, for which you can create exceptions. Again, each phone
type and OS version handles this a little bit differently, but not so much so
that you should have any trouble following along.
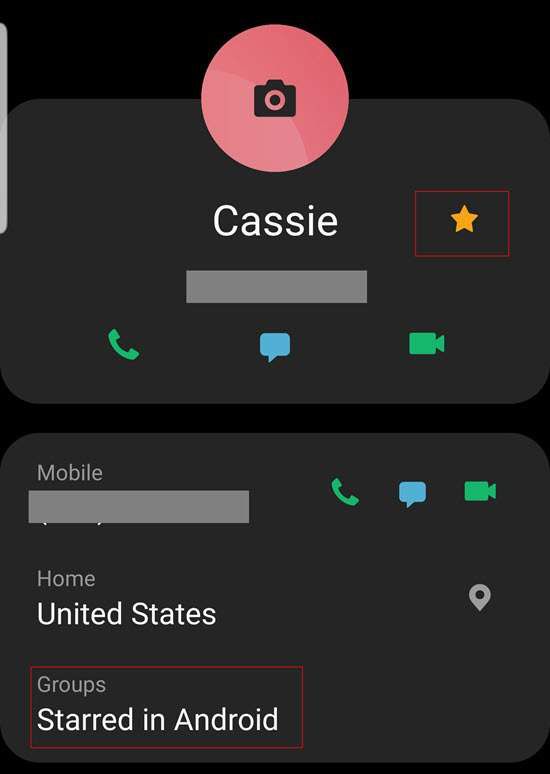
With calls and messages, you have several options. You can, for example, allow all calls through; allow calls from only those in your Contacts app, or only those marked as favorites (or “starred”) in your Contacts app. The options for text messages are the same.
In case it’s not obvious, then, the way to restrict the receipt of messages and calls from only specific people is by designating them as favorites in your Contacts app.

One more way to make DND a little more efficient and not nearly as unforgiving, is the Repeat Callers option. Typically, in emergencies most people will try to call you more than once.
When that happens, when a second call comes from the same number within 15 minutes of the first call, with Repeat Callers turned on, DND will allow the call to go through. Granted, this is not exactly foolproof, but a nice option.
Lots more to do
Do Not Disturb is more robust on some devices than others, and for the most part I’ve covered just the basics here. You can, for example, modify which kinds of notifications (i.e., sound, icon badge, vibration, and so on) are used in specific scenarios.
Say, for instance, telling Android not to turn the screen on when making a notification, or stopping pop up notifications when you are already in the middle of something on your phone.
In any case, there may be
several other ways for you to tell Android when and how it’s appropriate to
bother you; what we covered here should get you started.